Category Archives: Dessert

Just want Chocolate


For the past few baking posts I’ve shared recipes that starred peaches and blueberries, the bounty of our Farmer’s market.  But, you know what is always in season?  Chocolate.  Sometimes chocolate like to be eaten straight from the wrapper, but sometimes it wants to get dressed up and be a star and this cake lets it be the star.

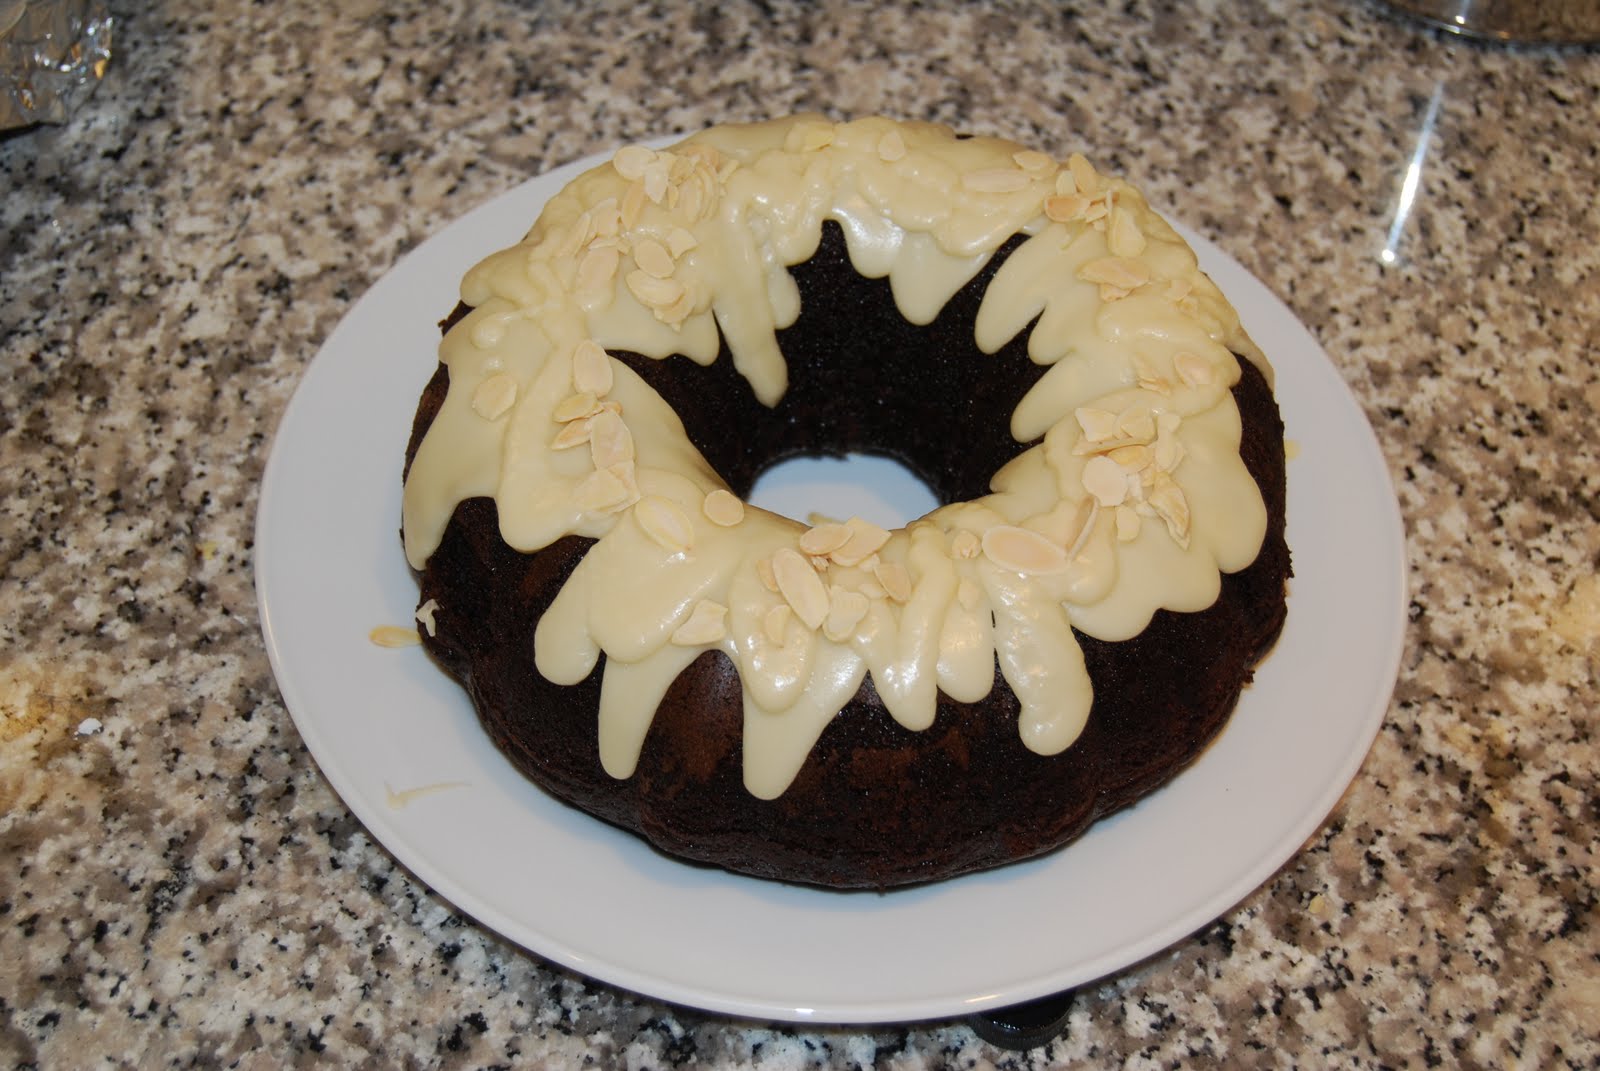
Chocolate Bundt Cake with Vanilla Frosting

Ingredients for Cake:
1 cup chocolate chips
1/2 cup (1 stick) butter, softened 
1 cup boiling water
2 cups all-purpose flour
1-1/2 cups sugar
1/2 cup Hot Chocolate Powder
2 teaspoons baking soda
1 teaspoon salt
2 eggs
1/2 cup Greek Yogurt, 0%
1 teaspoon vanilla extract
Heat oven to 350°F. Butter and flour a standard bundt pan.
Combine in a medium sized bowl the chocolate chips and softened butter, and stir in the boiling hot water.
Blend together until the chocolate, butter and hot water make a silky chocolate soup.
In a separate bowl combine flour, hot chocolate powder, baking soda and salt and gradually blend in the chocolate soup.  

Then add the eggs, yogurt and vanilla and continue to blend, and pour into the prepared bundt pan.
I retained a little bit of the batter for 4 cupcake sized portion since we had friends over, and I wanted to taste test the new recipe, so I only baked it for around 40 minutes, even though the recipe calls for 55 to 60.  I would recommend checking at 40 minutes with the toothpick trick and then extending for five minutes and checking again.
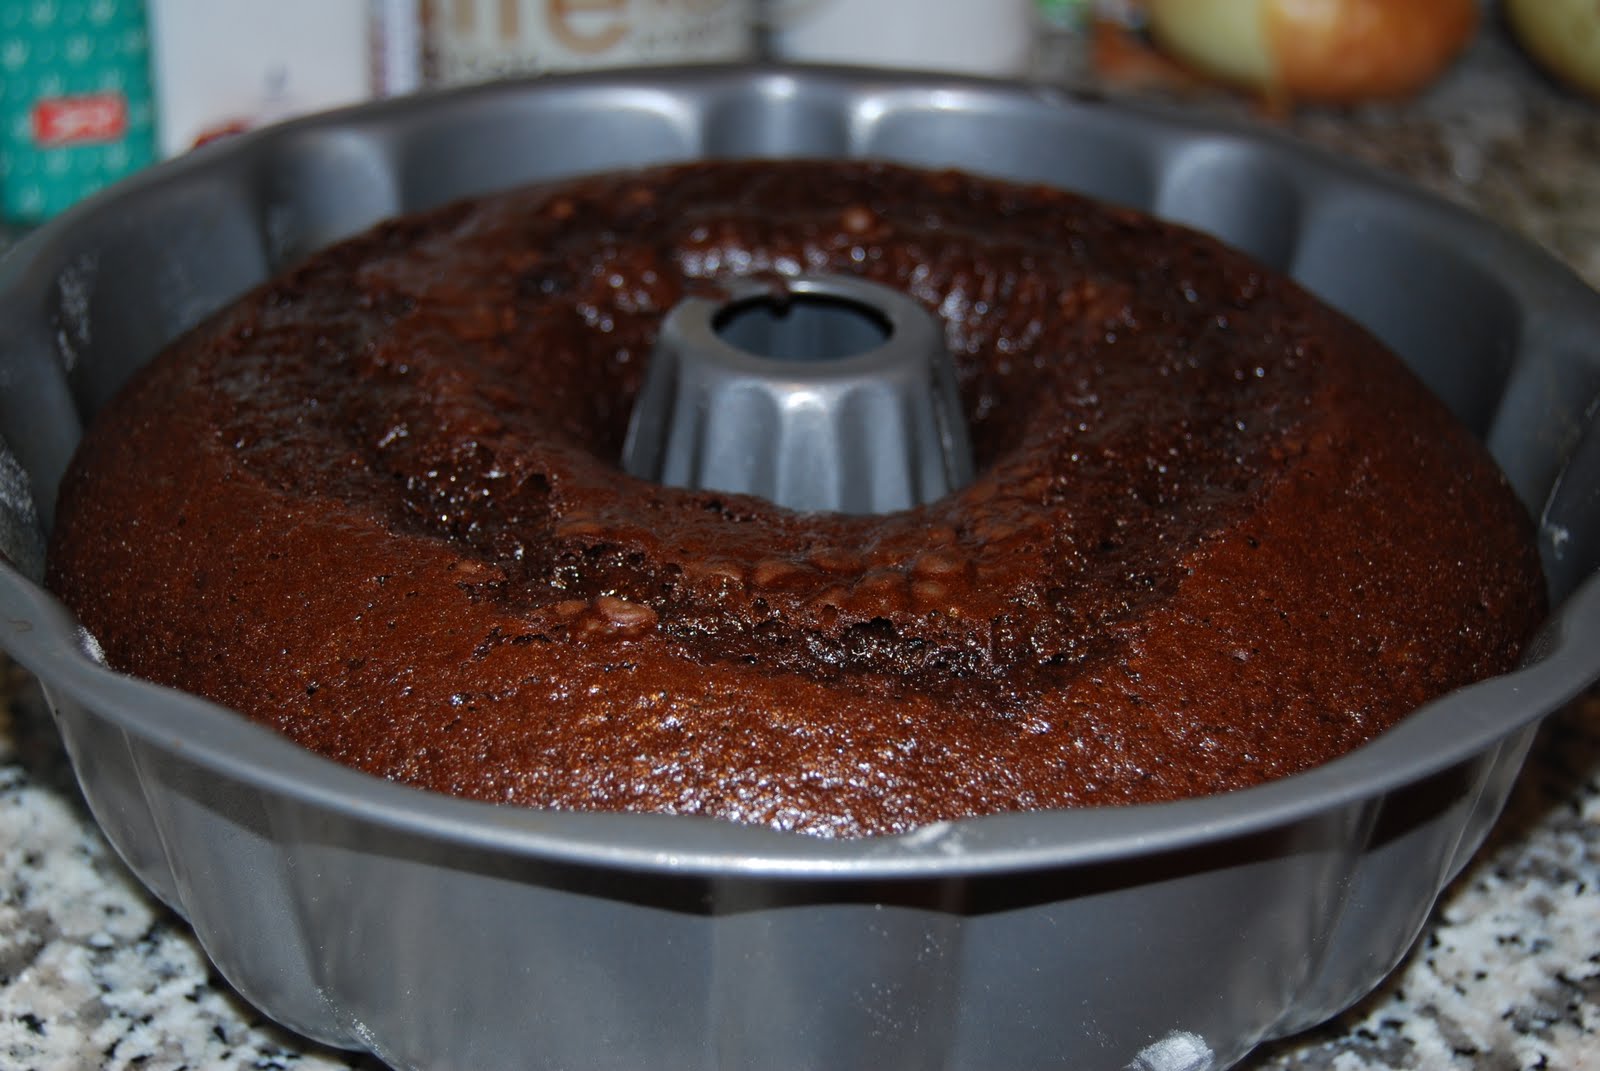
After baking, let the cake cool in the pan for at least ten minutes, and then invert on a plate and if time allows continue to let cool.  I made my cake the night before a family party and made the glaze the morning of, but I am sure they could all be done the night before and would stay beautiful and delicious.

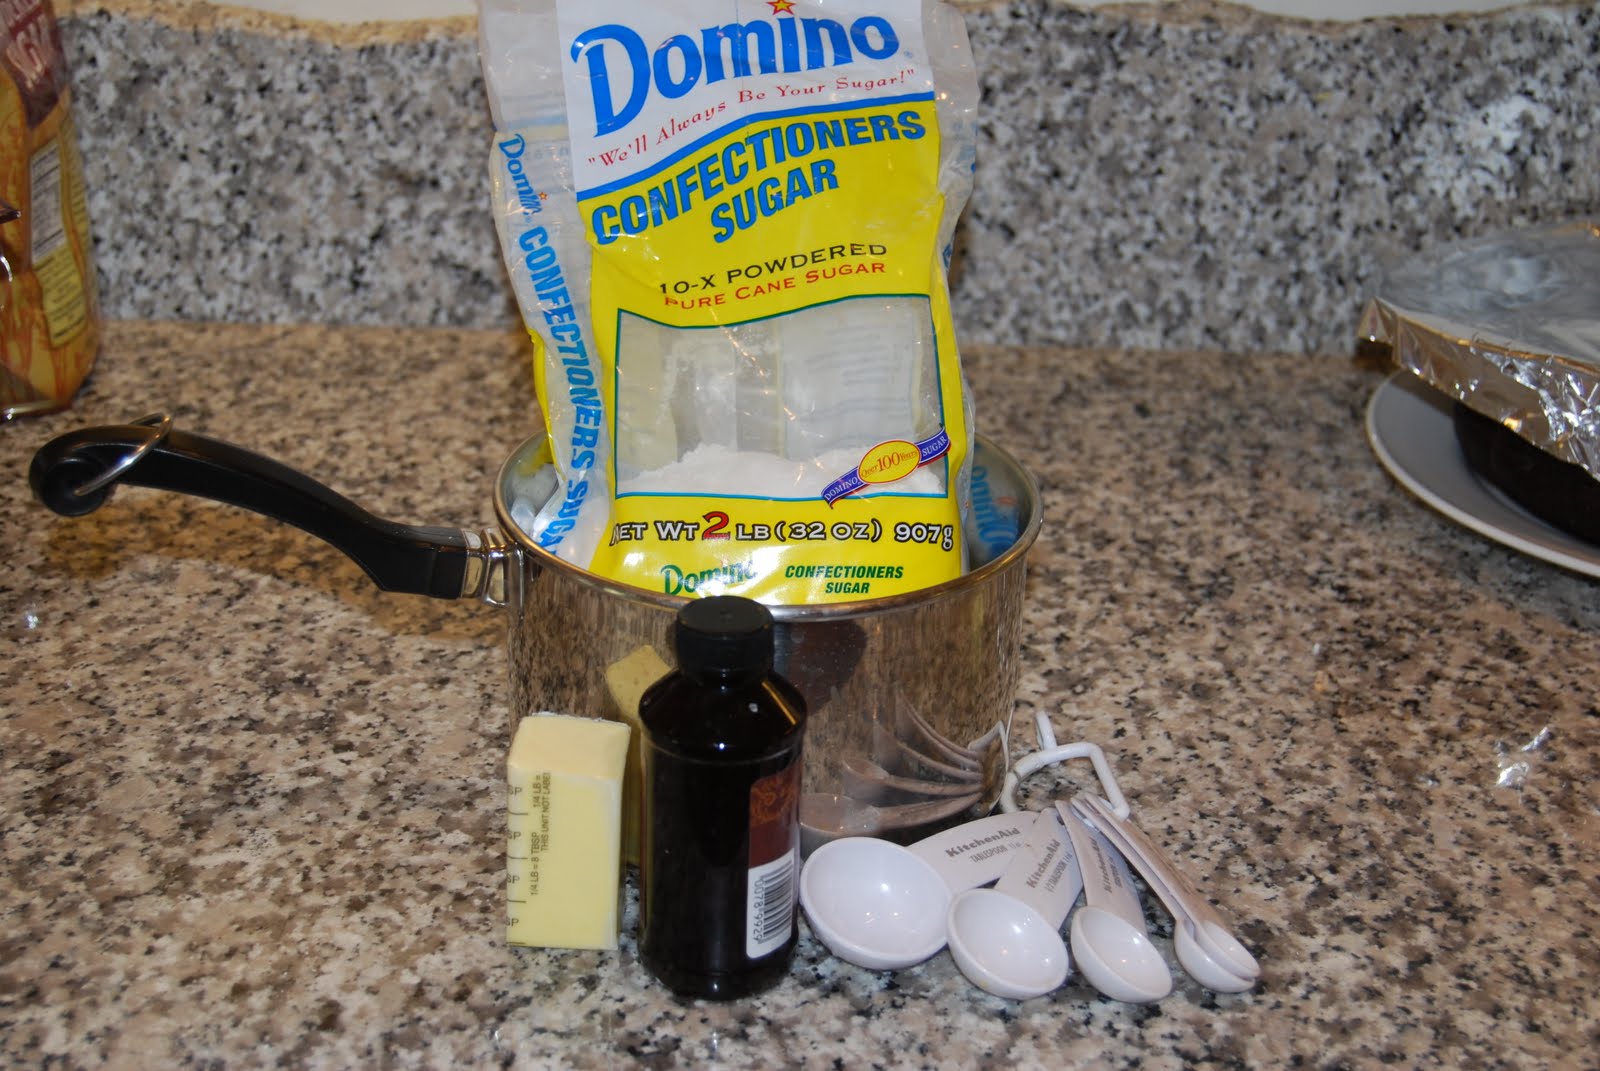
Ingredients for Glaze:
1/2 stick of butter
2 cups of powdered sugar
1 teaspoon of vanilla extract
2 – 3 tablespoons of hot water

This might be the most simple, most delicious frosting.  I think  you could be creative and add food color, or other flavor extracts (almond, mint, liquor, lemon, etc), but I kept it simple.

Melt the butter and gradually stir in the powdered sugar, water and vanilla.  
 Beat by hand with a whisk until smooth, adding more water a teaspoon at a time if you’re finding it too thick, or lumpy.   This makes more than enough glaze – so maybe you’ll lick the whisk, or share with a friend!


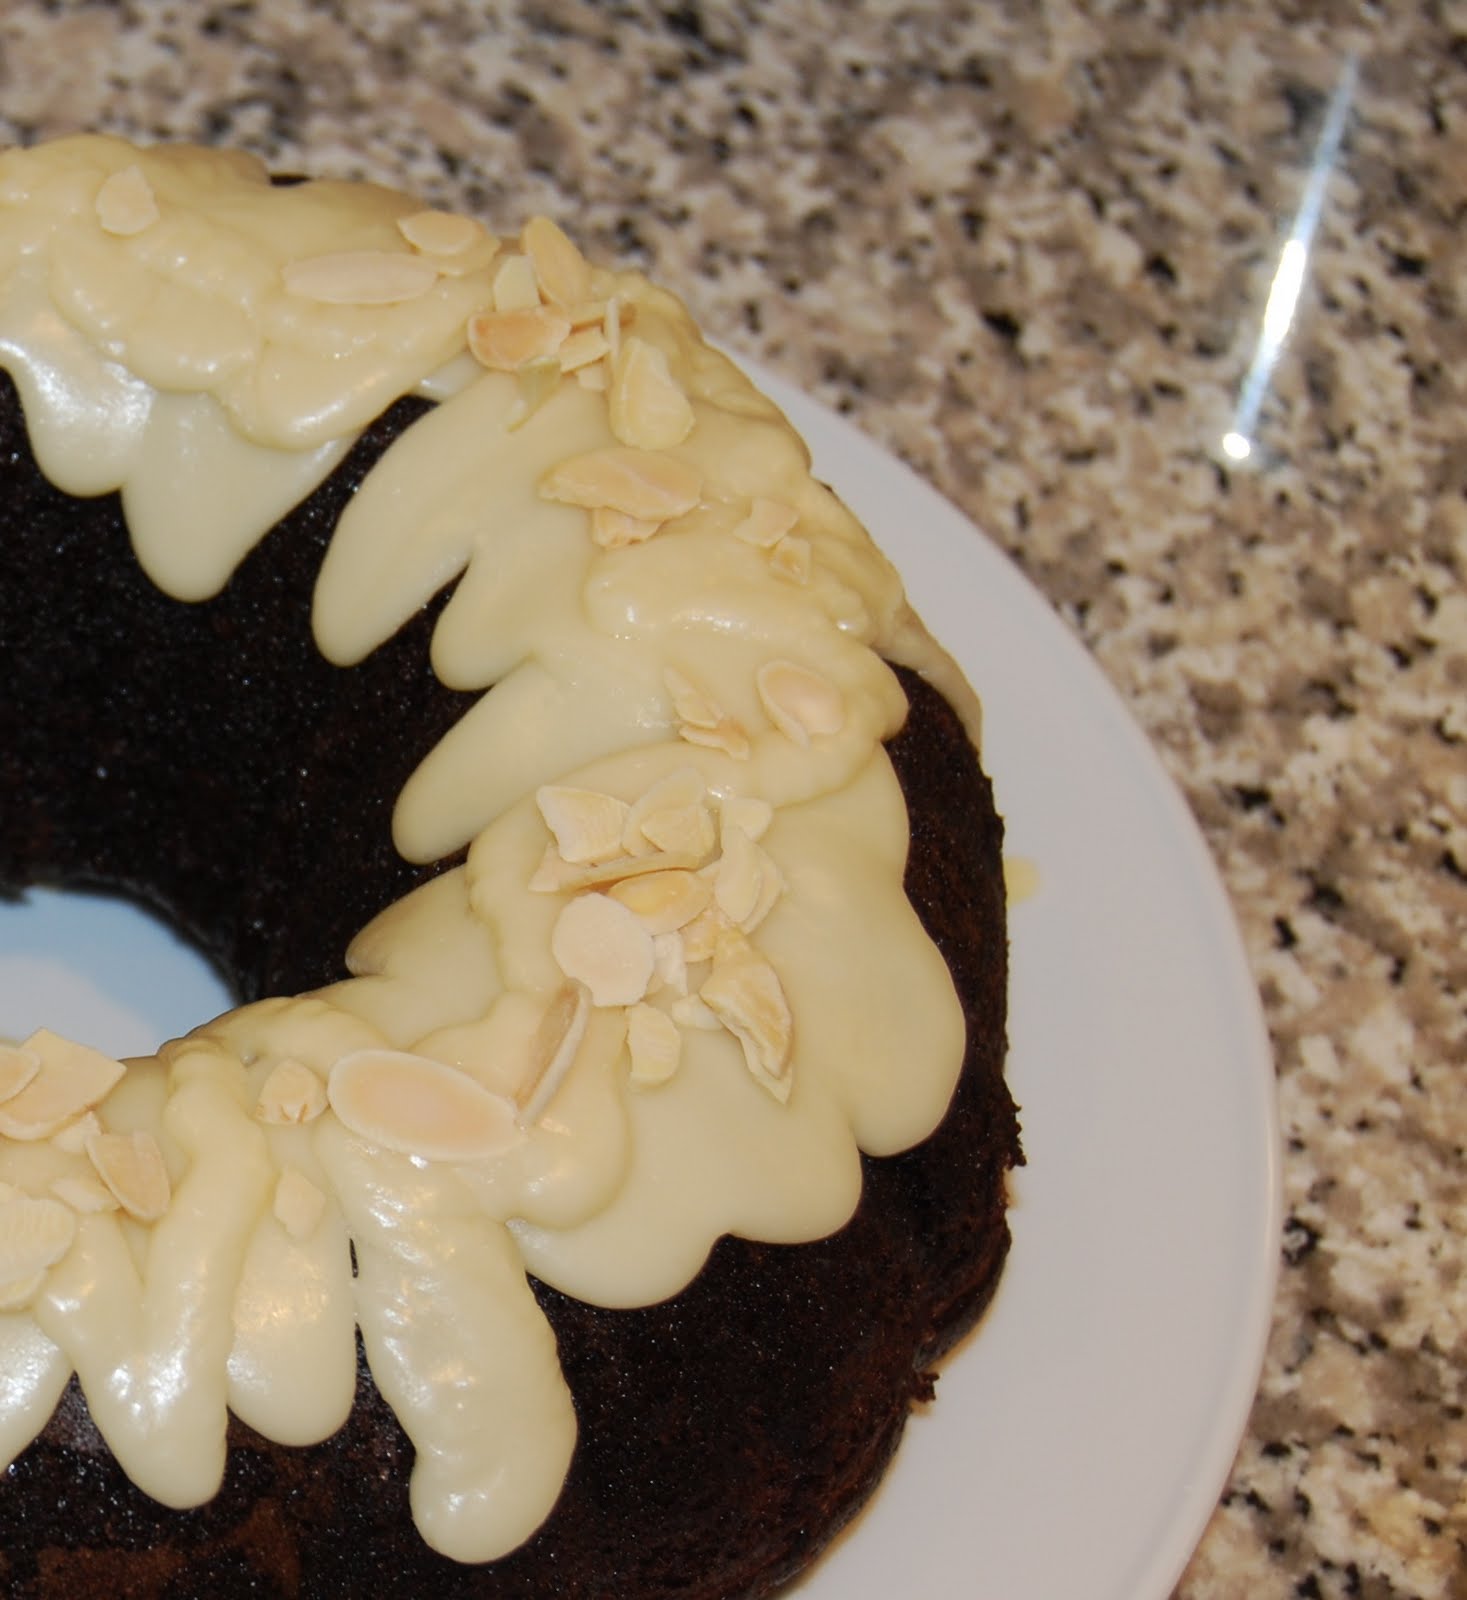
Pour a generous amount all around the cake, in any free form design.  I think with a cake this classic it doesn’t need to look “too perfect”.   I added some plain slivered almonds for fun – and crunch.  

Cut a big slice and enjoy!  This cake is sweetened with the sugar and chocolate chips, but not too sweet with the balance of the yogurt.  I think you could tweak this recipe with nearly anything you had on hand.  It’s so moist you don’t need anything else, but that doesn’t mean you wouldn’t love it with a scoop of vanilla ice cream!

The Cake that Stole the Show, or Blueberry Harvest Cake


Blueberry Harvest Cake
Part of the joy of getting a pedicure is reading the magazines.  And I was extra joyful when I stumbled upon the August issue of Food & Wine Magazine.  With tributes to Tuscan Farm to Fork cooking and a feature on Greek Chef/Philosopher Michael Psilakis I was hooked.  

On Sunday, a few days after the pedicure, we were having Mark’s family over for lunch to wish his mom a “buon viaggio” before her trip to Italy.  This was our first time entertaining in our new house, and we toiled on the menu, prepared on Saturday, shopped our Farmer’s Market Sunday morning and cooked and cleaned just until showtime.  On a hot day, and a full menu the big debate was dessert, and then I remembered the magazine.

The Cake that Stole the Show, or Blueberry Harvest Cake 
adapted from Food & Wine Magazine, August 2010

All the ingredients ready to be delicious
Ingredients:
1.5 cups all-purpose flour
1 teaspoon of salt
3/4 teaspoon of baking powder
2 large eggs
2/3 cup granulated sugar
1/3 cup of milk
1/4 cup of extra-virgin olive oil
4 tablespoons of unsalted butter, melted
1 teaspoon vanilla extract
1 – 1.5 cups of blueberries, fresh
Confectioners Sugar for dusting
Use a 9″ springform pan
Oven at 350 degrees

Whisk the dry ingredients: flour, salt, and baking powder.

In a separate bowl whisk, by hand, the eggs with granulated sugar until fully combined and a smooth yellow color.  

Then pour in the vanilla, milk, and olive oil and continue whisking by hand.  Slowly and while whisking continuously, pour in the melted butter.  It’s a good idea to let the melted butter cool for a few moments as this cake would not taste good with scrambled olive oil eggs.

Fold the flour mixture into the egg mixture, again by hand, it will be a beautiful golden yellow color.  Try to resist “taste-testing”, I usually cannot, but I know that I should.

Pick your favorite fruit.  The Food & Wine recipe calls for seedless red grapes, but since I live in DC and not Napa, and since blueberries are delicious right now, I adapted.

Fold the blueberries into the batter with a whisk and a gentle hand, being careful to not crush them along the way.


Pour into springform pan and bake for 15 minutes.  At fifteen minutes remove the cake from the oven and pop on a few more blueberries on the surface, and return to the oven for another 30 minutes.  Check to ensure it is fully baked with a toothpick – clean toothpick means it’s done!

After the cake has cooled sprinkled on some confectioner’s sugar and you could serve it with more fresh berries, like I did, whipped cream, vanilla ice cream, a blueberry sauce or just plain, because it is just that moist and delicious!

Oh, so why the name?  Why the “Cake that Stole the Show”? because after a delicious Caprese salad, Aged Cheddar and Bacon Macaroni, perfectly seasoned baked chicken breast and a salad that would make any farmer proud – this cake was devoured.  And Mark very proudly boasted, this was the best cake ever, it “stole the show”.

Everything is sweeter when small


These are cutie pies. Pies are pretty much my favorite thing. Small things also rank pretty high on the list of favorites.

I’ll share some Joey Tribiani logic with you,
Pie = butter + flour + sugar = delicious
Small = handheld + portable + more fun – plates = cute

Small + pies = cutie pies = good

I didn’t always get in “A” in Math class, but I am pretty confident with that equation.

So the key to any good pie is good dough.  I told you I preferred to make my own dough, so I am glad I was able to share this with you on such a cute, summer, recipe.  I learned this recipe at Smitten Kitchen.
Pie Dough – makes two doughs or approximately 10 cutie pies with lattice tops.
2 1/2 cups flour
1 tablespoon sugar
1 teaspoon salt
2 sticks (8 ounces, 16 tablespoons or 1 cup) unsalted butter, very cold
*With a naturally sweet filling like peaches I might add just a touch more salt.


So, you could make this dough with a food processor, but then you can’t really control the texture, or with a pastry cutter, but I can’t find mine, or with two butter knives, or forks…

Then I put my hands in there and really work it through.  If I remember I take my rings off first – I rarely remember – that’s a good thing.  I shaped it into a nice, big, buttery ball.

The magic with pie dough is all in keeping the butter cold so that when it’s rolled and then baked the crust is rich, flaky and amazing.  Now that the dough is a pretty smooth ball I divided it and wrapped in plastic (or parchment/wax paper) and stored it in the refrigerator for at least an hour.

For the filling I followed my intuition – that often seems to work.  
Peach Filling for 6 Cutie Pies:
5 Peaches
1.5 tbsps granulated sugar
2 – 3 shakes of cinnamon
1/2 tsp of corn starch
**I probably ate a peaches worth of cut up peaches after making the pies…

To remove the fuzzy skin – I boiled a small pot of water and dunked the peaches in the boiling water on the stove for about 15 seconds.  After their spa experience they all get dunked in a bowl of ice cold water so that they don’t continue cooking.  At this point the skin peels right off.

For Cutie Pies I like the fruit pieces to be a bit on the smaller side, since the container is smaller too. Once everything is chopped I sprinkled in the sugar/cinnamon/corn starch and just let it hang out for a little while.  The fruit loves the sugar – it doesn’t need much but, when they’re together they make some really delicious things happen. 


Time to get rolling…
So, you caught me.  I don’t own a rolling pin.  I love pie and I don’t own a rolling pin.  We used to live in a considerably smaller home, with a significantly smaller kitchen and therefore I have grown accustomed to using a Chopan Vodka Martini mixing bottle as a rolling pin.   It’s a bit silly, but it works.

Anyway, throw down some flour on the work surface and keep some handy for the bottle/can/rolling pin/whatever.

I use a muffin tin as the pie pan and a juice glass to cut out the circles.  The pan doesn’t need any additional grease as the dough is already pretty deliciously buttery. 

I put in generous servings of fruit – it makes it more fun to get a sweet bite of peach in every, single, juicy bite.

With the excess dough I cut out little strips and made a mini lattice for the tops.  With my fingers I rubbed a bit of skim milk, but you could use an egg wash or water in a pinch, and sprinkled some raw sugar on top. 

I forgot to mention… you’ll want to bake these at 350 for about 20 minutes.  Due to the small size, and the sensitivity of different ovens – keep an eye on these babies.  Also, if you’re not into cleaning ovens, (and really who is?) try layering the muffin tin on a cookie sheet so that any extra bubbly juices land on the sheet and not the oven or racks.


And then it’s time to eat.  And eat we did! 

Life gives you Lemon Meringue Pie


>

Two things to know about me:

  1. If I am going to someone’s home I will always offer to bring something
  2. I am a pie girl, I take the buttery, fruity, chocolatey, sweet, savory type over cake on nearly any day.

Okay, back to present, last Sunday an invite for Father’s Day and my sister-in-law’s mom’s birthday linner is sent out. It turns out my sister-in-law’s mom’s favorite dessert is Lemon Meringue Pie. Full disclosure, I have never made a meringue, I have never made a lemon pie, and I have actually never tasted a lemon meringue pie. Sounds good, I can do this. By Thursday the above mentioned really starts to sink in. By Friday I am actively looking for recipes (thank you http://www.epicurious.com). By Saturday I am grocery shopping, and by Saturday evening a panic is starting to settle in.

Sunday I bake.


Ingredi
ents: Pie crust, you’ll get this recipe at another time. Because of the doubt I was feeling about the filling and the topping I went with a store bought. Homemade or store bought you’ll want to use pie weights (rice, beans, pie beads) and pierce the dough with a fork – like you might have done with a frozen tv dinner’s plastic wrap as a kid.

Filling

1 cup sugar

5 tbsp cornstarch
1/4 tsp salt
1 cup water
1/2 cup milk
4 large egg yolks
1 tbsp unsalted butter
1/2 cup fresh lemon juice

2 tsp fresh lemon zest

Meringue
4 large egg whites
1/4 tsp cream of tartar
1/2 cup of sugar

Recipe from Gourmet Magazine, 1995

Make filling:
In a heavy saucepan whisk together sugar, cornstarch, and salt and gradually whisk in water and milk, whisking until cornstarch is dissolved.
In a bowl whisk together egg yolks. Cook milk mixture over moderate heat, whisking, until it comes to a boil, this happens all of a sudden and the mixture is surprisingly thick.
Take the pan off the stovetop and gradually mix into the egg yolks, whisking all the while so that your eggs aren’t scrambled. Return egg and cornstarch+milk mix to the stove. Simmer mixture, whisking, 3 minutes.
Remove pan from heat and whisk in butter, lemon juice, and zest until butter is melted. Cover surface of filling with plastic wrap.
Make meringue:
In a large glass or metal bowl with an electric mixer beat egg whites with cream of tartar and a pinch of salt until they hold soft peaks. Beat in sugar in a slow stream, beating until meringue just holds stiff peaks.
Pour filling into shell and spread meringue on top, covering filling completely, sealing it to pastry. I found it worked best to allow the meringue to lap up onto the baked pie crust. Draw meringue up into peaks and bake pie in middle of oven at 350 until meringue is golden, about 15 minutes.


Somewhere along these steps the first pie crust that I blind baked shrunk in the pan, do not forget to pierce the dough! So as I continued to mix, blend and whisk I snacked along the way on shrunken pie crust – it tastes just as good as you’d imagine, very.

The meringue was definitely the most intimidating, it’s very humid in DC (not good for flully egg whites) and after watching many episodes of Alton Brown I imagined it would be something you would have to learn how to make only from practice. Hah! Alton is such a good teacher, it worked! I just kept looking for the peaks. That’s them in picture #3.

Success! The pie was delicious, the meringue did shrink up a little bit and slide across the filling. So, while it didn’t look as picture perfect upon delivery as it did on the counter, it did get good reviews for taste. Things I would do differently next time: Put the meringue directly on the warm filling, this helps to set the egg whites; not drive 2+ hours before it gets served, this allowed the meringue to ride a slip and slide all the way there.