Category Archives: Comfort Food

Hungry for the Weekend


It’s been a long week, maybe because for the first time I am so sincerely looking forward to tonight’s dinner reservation, Graffiato!  I have been a long-time Top Chef fan and always support the local cheftestants, Spike, Carla Hall and Mike Isabella.  I’ll tell you all about it next week!

Until then, there is a lot to keep you full and satisfied during the weekend.  Here are some inspiring foodie links and some links to make you think, and make you laugh.

F-You Yelper

If you, like me, are hungry for the weekend please, enjoy these links:

Have a delicious weekend!

Late Night Pancakes


We used to live in Arlington, VA, but in a high-rise condo, so we had the feel of city-living.  Our building was directly adjacent to an IHOP – one that we have visited on NYE, and after my bachelorette party. Now we live in a suburban enclave in DC and there are no IHOP’s within reach.

That doesn’t mean that distance quells the need for pancakes every once in a while.

The funny thing about pancakes is that you can buy a wide variety of mixes, but you’re still adding ingredients to the mix, so why not just make them yourself, from scratch?!

Late Night Healthy Pancakes – from scratch!
1 cup whole wheat flour
1 1/2 tablespoons baking powder
1 tablespoon ground flax seeds
1 teaspoon cinnamon
1/2 teaspoon salt

1 egg
3/4 cup water/skim milk
1/2 cup non-fat Greek yogurt
1/2 cup apple sauce (*snack cup sized)
1/2 teaspoon vanilla extract
1 tablespoon vegetable oil
1 tablespoon honey

*Makes 8-10 3-4″ pancakes

In a medium sized bowl mix the dry ingredients together and set aside. In a small bowl whisk the wet ingredients together and then slowly add the wet ingredients to the dry ingredients.

In a griddle pan on low to medium heat add a pad of butter and when that has melted, but not burned, ladle the first scoop of batter (about 1/4 – 1/3 of a cup).

Let the pancakes cook on one side until bubbles begin to appear at the top, and then flip. Too much flipping, or too much time will create burnt little cakes.

These pancakes aren’t like the ones you get at IHOP, with big huge air bubbles, and the kind of texture that makes you think you can stuff an entire 12-inch pancake in the sides of your cheeks. These are pancakes for grown-ups (or people who call themselves grown-ups!). These are made with healthy ingredients, and no sugar, and crazy ingredients like flax, and protein rich Greek yogurt.

These are pancakes that have some bite, and you can eat for dinner, and maybe for breakfast the next day. And, you know for fun, with a lot of syrup!

Berry Good Breakfast Muffins


True story, inspired by “If You Give a Moose a Muffin”, if you’re coming to my house, I am going to make sure that there is coffee.  And if there is coffee you’ll probably want something to eat. And if you’re going to eat something it might as well be a muffin.  And if people are going to be eating muffins, I am going to be baking them.

That is the story behind these Berry Good Breakfast Muffins, we had people coming over at 7am (*I know!  That is crazy early!) and I thought 7am visits deserve muffins.  But, these muffins shouldn’t be cloyingly sweet, or filled with butter and chocolate.  They should be a healthy breakfast is a small paper cup.
Berry Good Breakfast Muffins Ingredients
adapted from Joy the Baker’s Raspberry and Jam Muffins
1 1/4 cups whole wheat flour
1 1/4 cups dry oatmeal
1 tsp baking powder
1/4 tsp salt
1/2 tsp cinnamon

1 cup unsweetened apple sauce
1/2 cup nonfat Greek Yogurt
1/2 cup brown sugar
1 egg

2 tablespoons raspberry jam (I use no sugar added)
1 cup chopped blackberries

In a large bowl add all of the dry ingredients, flour, oats, baking powder, baking soda, salt and cinnamon and with fork blend together.
In a separate bowl add all of the wet ingredients, egg, yogurt, apple sauce and sugar.  With that same trusty fork blend these ingredients.  There is something to be said about a recipe that doesn’t require, or isn’t made any easier by using an electric blender.
When the wet ingredients are blended all the pieces will be fully incorporated and smooth.  Slowly add the wet to the dry and incorporate together and whisk together so everything is one big batter.

I used blackberries because that is what I had on hand.  I chopped them up so that the juice would flow throughout each bit and because blackberries are bigger and have a stronger flavor than blueberries (another delicious option).  Really any fruit works here.

With each scoop of jam I broke it apart into smaller chunks within the batter and very gently folded it in without turning the batter a pretty shade of pinkish purple. 

Set these little breakfast bites into a 375 degree oven for 16 minutes.  The batter makes 18 muffins, so you might want to invite people over at 7am to share these with and enjoy!

Rainy Day Cravings: PB + J AAF


Welcome to Day 2 of rain in Washington, DC.  Here is the thing, when it is raining I feel like blech.  I don’t want to run, I don’t want to think about how my hair is growing (wider/frizzier) by the moment, and I don’t want to get wet (and in DC, cold).  All I want to do is read, watch, eat.  

Some might say this is the perfect weather for grilled cheese and soup.  Even that sounds too time consuming…  I want salty, crunchy, nutty peanut butter and sweet, fruity jelly.  

Here are some hometown favorites:
 
Please note, if you are ever making a PB + J sandwich, treat yourself right and do the trick my dad taught me: Toast some fresh Challah,  egg bread/brioche, and then slather both pieces with peanut butter and then both pieces with jelly.  The warm bread ups the flavor and out of this world comfort of this food and pairs amazingly with a cold glass of milk.

Bite courtesy of yours truly
How about this for breakfast?

 Pillsbury Waffle Sandwiches are nothing short of brilliant.  We do this a lot for breakfast or a mid afternoon/night time snack.

Lunchtime!
This clever design comes from  Serious Eats and NY’s Peanut Butter Co – a restaurant that serves up so many PB & J sandwiches that they created one for every day of the year.  Photos of the clever creations are now on display at the Nutropolitan Museum of Art!
High Class PB & J?
This clever idea come from Bon Appetit’s new blog the Kookery.  The clever concept was for choosy mom’s with ever choosier kids.  Frankly, I think this works for 26 year old kids too..

Decadent PB & J
These Peanut Butter and Jelly Cups might be the most brilliant thing ever.  The deliciousness of a Reese’s Peanut Butter Cup and a peanut butter and jelly sandwich?  Heavenly…

What do you crave for comfort foods?  How do you like your peanut butter and jelly time?

Apple Oatmeal Kugel


Over the long and sometimes warm and sometimes very cold weekend I spent a lot of time behind my stove.  I really like to cook over the weekends and sometimes you (I) cook too much.  I also really don’t like to throw things away that taste great, and well, eating the leftovers to get rid of it all doesn’t really do anyone any good.

So, as necessity is the mother of all inventions, a new recipe was born.  It’s not exactly seasonal (apples really makes me think of the fall) but it is definitely comforting.
Apple Oatmeal Kugel*
Ingredients
2 cups cooked oatmeal
1/2 cup whole wheat flour
1/2 – 2 apples chopped
1/4 cup raisins
1 egg
1 tbsp of brown sugar
1/2 tbsp almond butter (negotiable*)
1 tsp cinnamon
1/2 tsp vanilla
1/4 tsp baking soda
1/4 tsp baking powder
1/4 tsp salt
1/2 tsp turbinado sugar (optional)
Juice from a 1/4 lemon
1/8 cup of slivered almonds

Step 1: Breakfast.  If you’re like me, when you woke up you thought about making something fun with low cholesterol oatmeal, but you have to have breakfast first.  So, you made an abundant amount of oatmeal. By the way cooking oatmeal is always a 2 (water) to 1 (oatmeal) ratio.  In this case I wanted a less watery version, so I went 3 cups of water, 2 cups of oatmeal, Mark and I both had a small bowl of oatmeal with toppings and about 2 cups of cooked oatmeal remained.  Don’t throw out the leftover cooked oatmeal!

Step 2: Oatmeal Toppings.  While the water is boiling and the oatmeal is cooking, chop up your favorite kind of apple (mine is Honey Crisp – they are out of this world good).  Add the apples and raisins to a pan on medium heat with a smidge of butter (like a 1/4 of 1/4 tbsp).  Let the apples and raisins begin to soften and add 1/2 tsp of cinnamon and continue to stir so that the fruit is completely covered.  For your breakfast take 1/8 cup of apples and raisins and reserve the rest for later.
Step 2: Dry Ingredients: After you finish your breakfast return to the pot where the oatmeal has now cooled.  Add the whole wheat flour, salt, baking powder and baking soda.  Combine all of these ingredients.  If the oatmeal is overly sticky – mine was – slowly add 1/8 cup of water at a time until it has a smoother consistency.

Step 3: Wet ingredients.  I included 1/2 tablespoon of almond butter in the oatmeal.  It added a warmer hint of color, but didn’t change the flavor – this is totally up to you to include.  For a nutty flavor I’d recommend at least a tablespoon.  Add the egg and the brown sugar and continue to incorporate.

Step 4: Back to the apples.  The apples and raisin have cooled and should a soft golden color.  Bring the pan back to a medium-low heat and add the vanilla and lemon juice.  Cook the apples until the juice is absorbed.
Step 5: Bring it all together.  Combine the apples and raisins into the oatmeal and then spread the entire mix into a 9×9 baking dish.  If so desired, and I am sure it is desired, sprinkle on additional cinnamon, turbinado (raw) sugar, and some almonds.  Bake for 45-50 minutes at 350 degrees.  
Here is the warning: your kitchen will have the warm, sweet smell of cinnamon, vanilla and apples.  You’ll know how relatively healthy this little snack is and will have a hard time just eating one bite, but that’s okay, because really (not just relatively) this is a pretty healthy way to go.

*So, I am calling this a kugel, because the flavor and consistency most closely reminds me of my Nannys’ (grandmas‘ – they both make it) noodle pudding.  There are no noodles, so noodle pudding is the wrong name, and kugel kind of sounds funny, but it’s pretty much what it is.  The other thing it is, is sweet, but not too sweet, healthy, but not boring, simple but not bland and probably something that will pop up on a holiday table of mine in seasons to come.

Grilled Eggplant Pesto Parmigiana


Sometimes I realize that the recipe featured here require a mixer, or an immersion blender, and for as much as I try to simplify recipes by using simple tools, it can become intimidating if your kitchen equipment is pieced together with hand-me-downs and college left overs.

This recipe requires not much more than George Foreman grill, the staple of every college “registry”, and it looks and tastes a bit more sophisticated than college.

Grilled Eggplant Pesto Parmigiana
Ingredients
1 large Italian eggplant
Pesto Sauce (either premade, or homemade – do it!  It is soo easy)
Grated Parmigiana cheese
Marinara sauce
Salt and Pepper

Preheat oven to 400 degrees.  On a cutting board slice the eggplant into 1/2″ coins.  Sprinkle generously with Kosher salt.  Salting the eggplant adds flavor and it also helps the eggplant to “sweat” out some of it’s moisture.

In a small bowl prepare the pesto sauce, come on, I know you went homemade.  Another even lower calorie option that is strong on flavor is crushed basil, garlic and olive oil – I recommend the frozen basil and garlic cubes at Trader Joe’s.
Lay the eggplant coins out on the grill and cook for 3-4 minutes or until golden brown grill marks appear and then rotate for a beautiful cross pattern.   
Lay all of the grilled eggplant slices on a cookie sheet and spread each slice with a 1/2 teaspoon of your spread.  (If you’re  not into pesto, or garlic, or basil, or whatever, a tapenade would be amazing, or just your basic marinara sauce).  Sprinkle with the grated parmigiana cheese and bake for 10 – 15 minutes or until the cheese is a little bit melted.
If you can help it, arrange the grilled eggplant slices on a plate and serve with fresh sauce.  If you can’t help it, try not to burn your fingers as you eat them right from the pan.  We ate them both ways in my house, and they taste just as good with or without the fancy presentation!

This makes for a healthy, affordable, and really satisfying dinner or appetizer for a crowd.  Buon Appetito!

Roasted Cauliflower and Lentil Salad


Between all of the baking I really try to make our dinners filled with an abundance of seasonal vegetables and big bold flavors.  Last week it was all about cauliflower.  Roasted, delicious cauliflower.  This very easy recipe was a snap for a weeknight dinner entree, side or weekend lunch.  It was divine – which is saying a lot for a veggie.


Roasted Cauliflower and Lentil Salad
Ingredients
One Head of Cauliflower
1/2 Vidalia Onion
1 cup of cooked lentils
1/4 cup raisins
2 tbsp Extra Virgin Olive Oil
1 tbsp White Wine Vinegar
1 teaspoon Curry Powder
1/2 teaspoon Paprika
Salt and Pepper to taste
Oven at 400 degrees
Instead of cutting the cauliflower into little trees, cut the head into slices across the sphere. 
In a small glass whisk the oil and vinegar and add the curry and paprika, salt and pepper.  The “dressing” now has a burnt orange color and fragrant scent.

I dipped the head of each cauliflower slice into the dressing and laid them all out on a covered cookie sheet.  With the remaining dressing, reserve about 1 tablespoon and drizzle the excess over the cauliflower.  Bake in over for 35 minutes.
With 10 minutes left on the cauliflower timer slice the onion and throw all of the onion slices into the remaining dressing.  In a non-stick pan over medium heat, cook the dressed onions until they are nearly translucent.  Add the pre-cooked lentils (I always use pre-steamed lentils from Trader Joe’s/Whole Foods/Wegman’s) and the raisins and allow the flavors to integrate completely.
When the cauliflower has fully cooked the dressed spots will be sweetly caramelized and the heads will be browned (and extra delicious)!

Add the cauliflower to the pan with the onion, lentils and raisins and let all of those flavors dance together and serve.  That is a delicious bowl of winter.

Roasted Butternut Squash Risotto


Risotto is a favorite dish in our house.  It is fairly easy to make, inexpensive to make a lot of and is a great alternative to pasta for a gluten free diet, and a vegetarian main course.

So risotto is one of those things where you can experiment a little bit with ingredients, as long as you follow the rules with timing.

Roasted Butternut Squash Risotto
Ingredients
1 Butternut Squash, chopped in 1-2″ pieces
1 tbsp olive oil
Salt, Pepper, Paprika to taste

1 onion, chopped finely
3 carrots, chopped finely
3 stalks of celery, chopped finely
4 cups of Vegetable/Chicken Broth
1 1/2 cup of arborio rice
2 tbsp of butter
1/4 cup of white wine
1/2 cup grated Parmigiana
Salt and Pepper to taste

Peel and cut the butternut squash and put all chopped pieces in a colander and drizzle with olive oil and sprinkle of salt, pepper and paprika.  On a covered cookie sheet lay out the pieces of squash and bake in the oven for 35 minutes at 375 degrees.

Once the squash is in the oven, move onto the risotto.  In a separate sauce pan bring the vegetable/chicken stock to a boil.  
In a large sauce pan add 1/2 tbsp of butter to the pan and then add the finely chopped onion, carrots, and celery. Add salt and pepper to taste – just a pinch, because you’ll continue to layer the flavors.

When the vegetables are softened add the rice to the pan on medium/low heat and let it saute until the pieces are translucent.  When the rice is translucent add the first ladle of stock.
Let the rice simmer in the broth, stirring frequently, until it is completely absorbed.  When the broth is absorbed add another ladle and continue the process of adding, stirring, absorbing until all of the stock is used up.   You’ll notice that as the broth is being absorbed the rice with release it’s natural starchiness and become creamy. 

After the last ladle, but before the broth is completely absorbed make a well in the rice and add a cup of the now roasted squash.  Using a potato masher (or a spoon), mash up the cup of squash and combine it with the risotto.  The mashed squash adds beautiful color and rich flavor.
Then add the rest of the squash, the remaining butter (in pieces) and the parmigiana cheese and gently stir all of the ingredients. 

This is a perfect winter weeknight dinner, enjoy the comfort of good food!

Tomato Soup + Grilled Cheese… Winter Perfection


You know what you’re supposed to do when it looks like this where you live?  

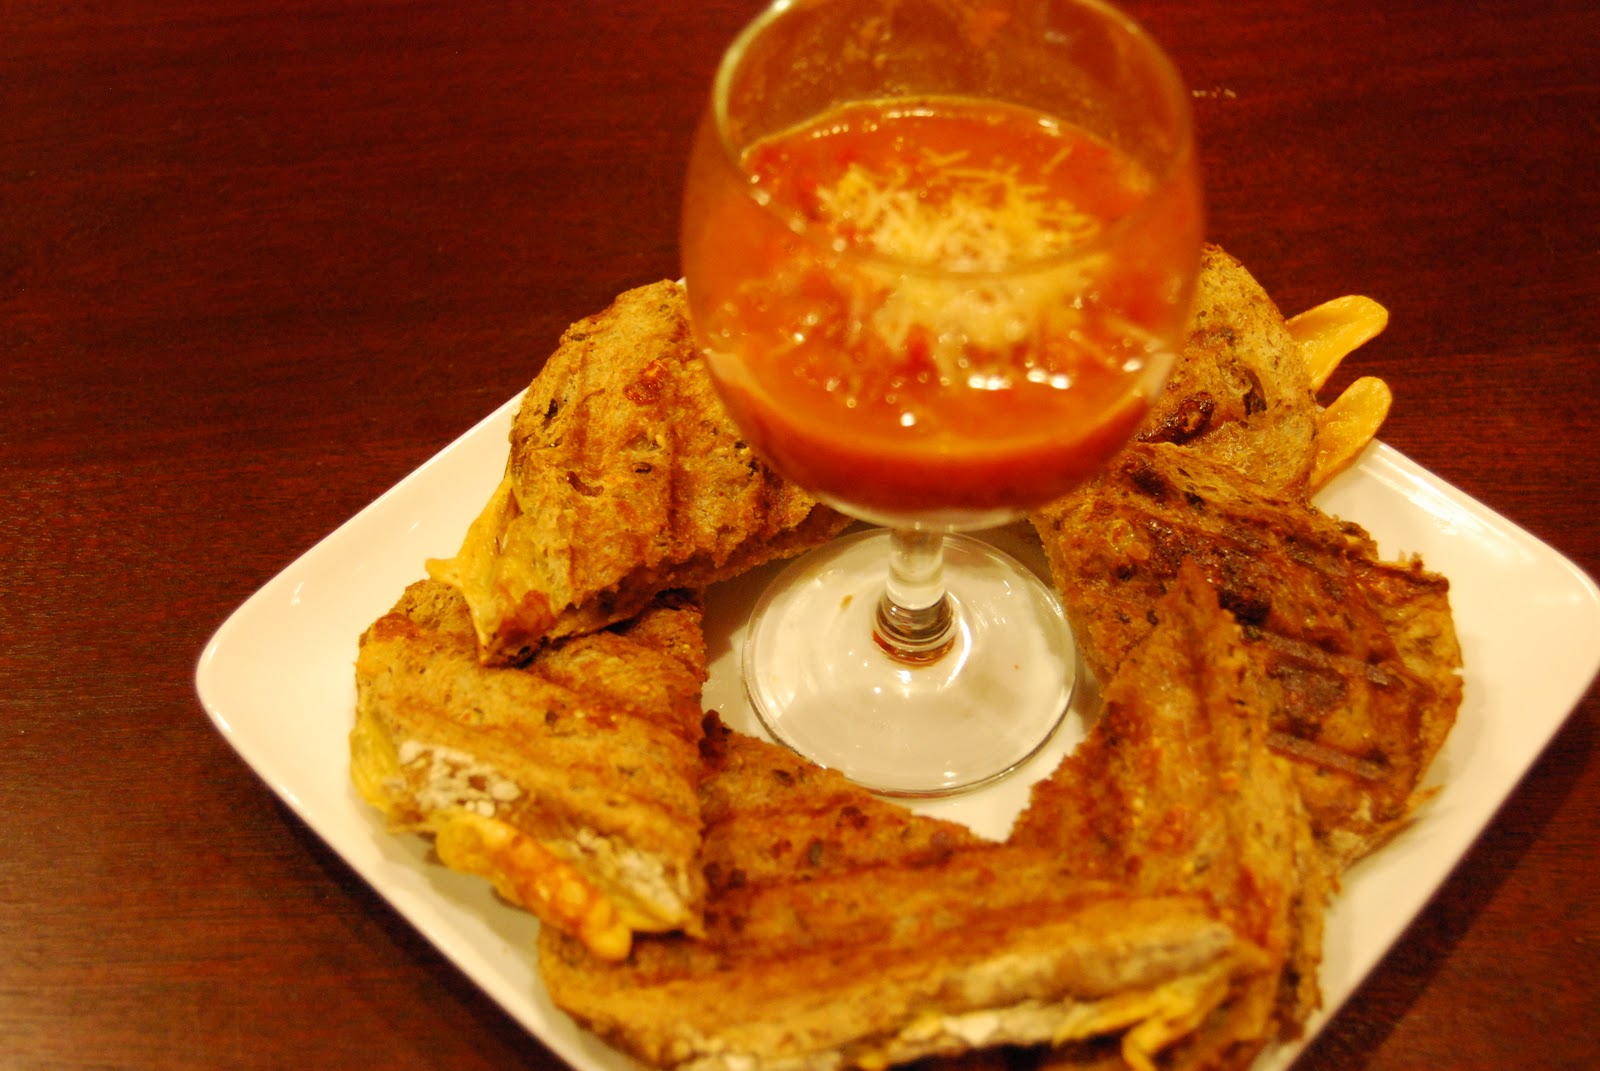
I’ll tell you.  You’re supposed to make soup.  A big bowl of soup, filled with vegetables and not much else.  If you’re looking for extra warmth then of course you’ll need a grilled cheese sandwich to go with it.

Tomato Soup and Grilled Cheese Sandwich
Ingredients
1 Yellow Onion
2 Cloves of Garlic
4 Stalks of Celery
3 Medium Carrots
1/2 – 1 Red Pepper
1 – 12 oz. Can on Diced Tomatoes
3 cups of Low Sodium Chicken Stock
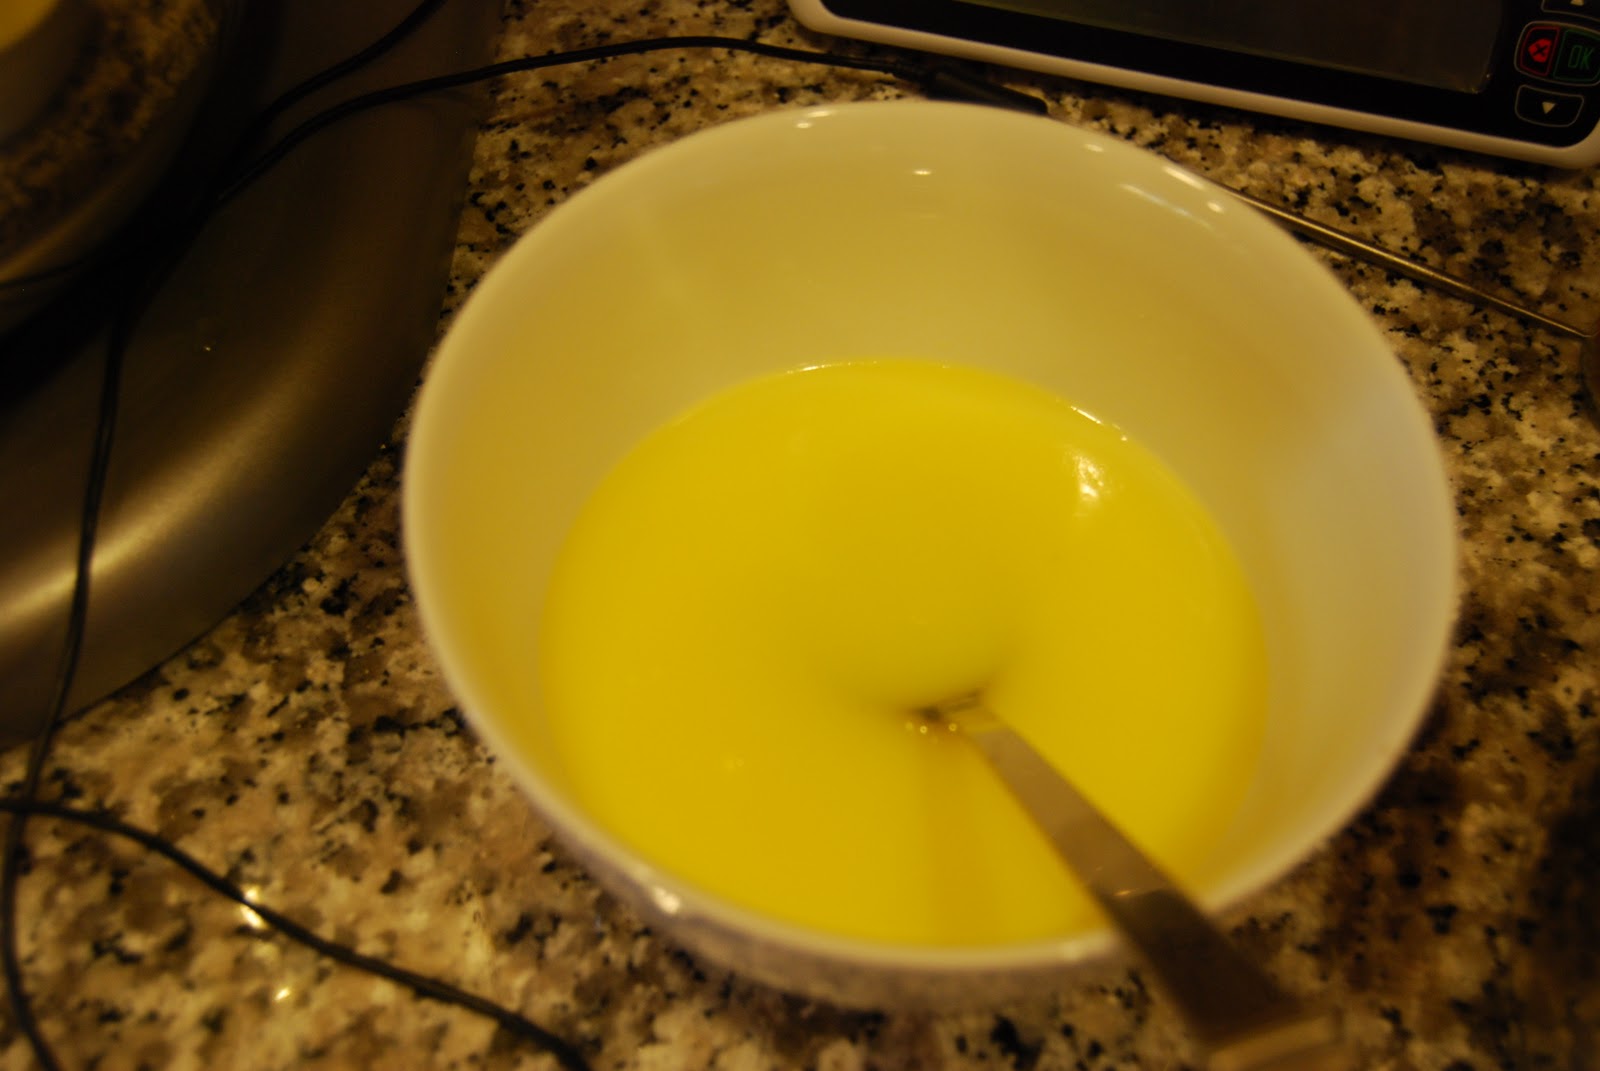
1/2 tbsp of unsalted butter
1 tbsp Olive Oil
Basil to taste
Salt and Pepper to taste
A splash of milk, totally optional
Grated Parmesean Cheese, also optional but, really good
Makes soup for 4 people, or 2-3 very hungry, cold people
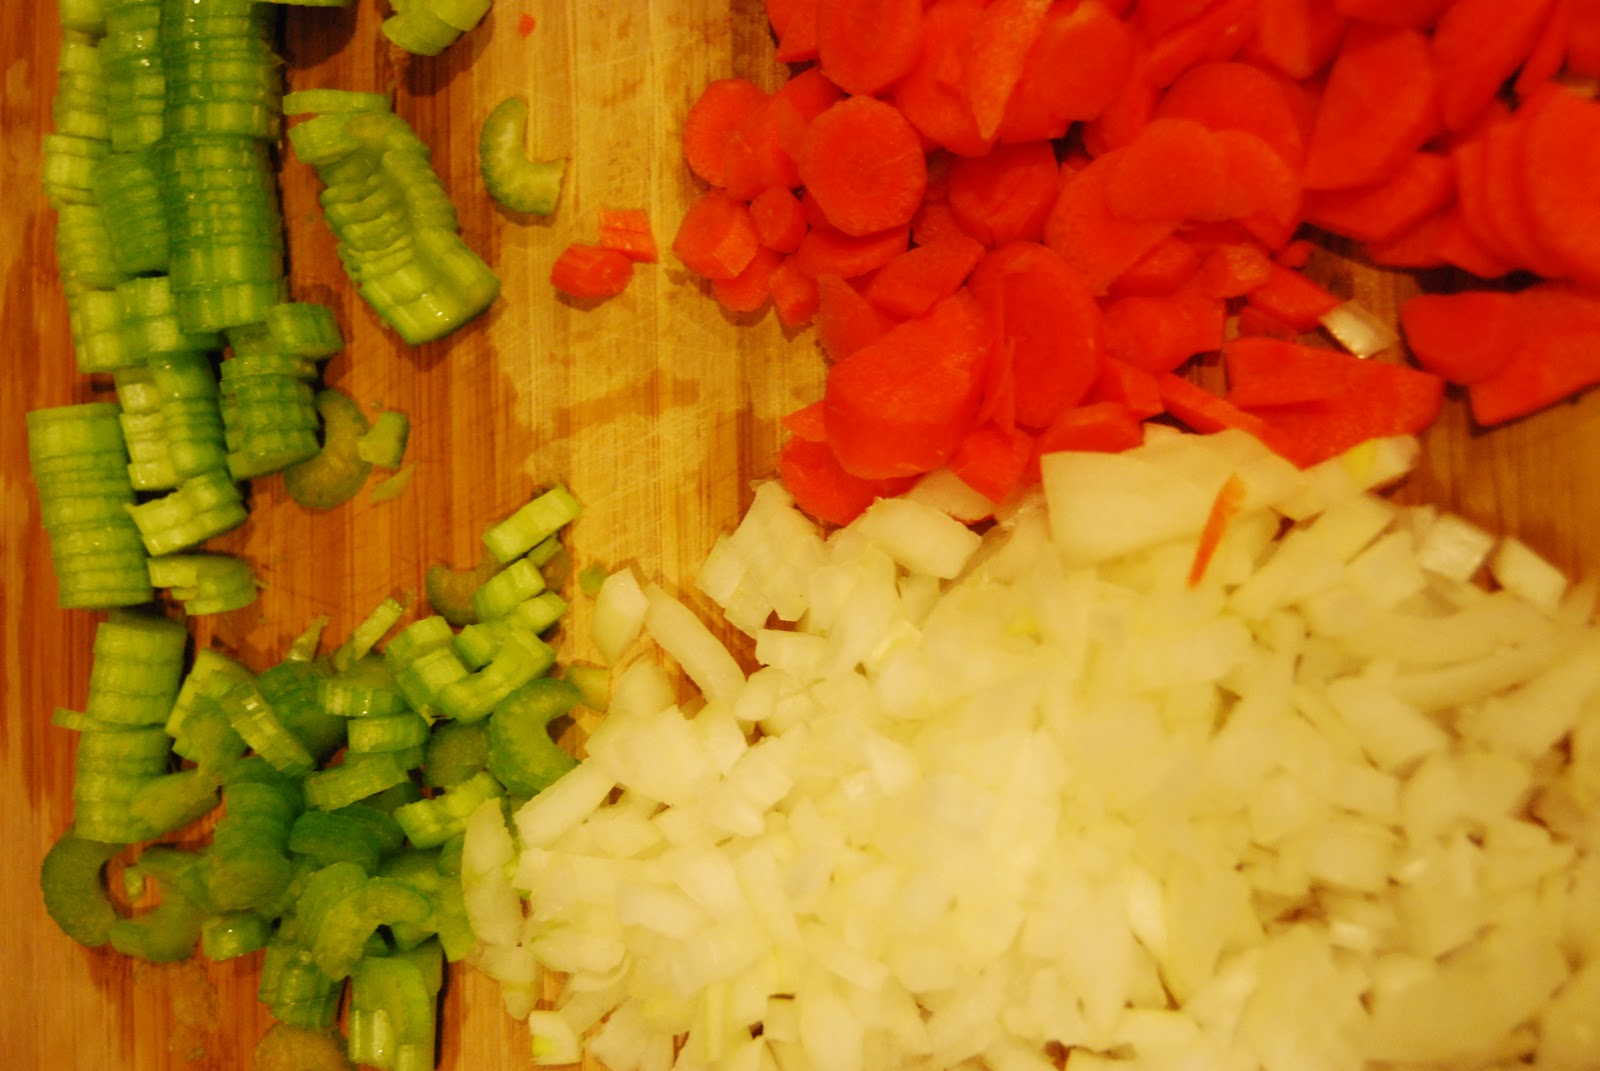
Set up your soup pot over low to medium heat with 2 swirls of olive oil.  Then add the diced onion and thinkly sliced carrots and celery into the pot.  Sprinkle a little bit of salt and stir the veggies gently and let that simmer for a few minutes.  Then add diced garlic.  Seriously, at this point you could just stand there and absorb the aroma – there are few smells I enjoy more than cooking garlic.

After the garlic, onions, celery and carrots get to know each other add thinly sliced red pepper.  I only had half of a pepper, maybe if I had a whole one I would have used a whole one.  The pepper adds a richer, sweet flavor and a beautiful deep red to the veggies. 
At this point I added a touch of butter and gave the veggies another good stir and let them continue to do their thing.  After 8-10 minutes of the veggies cooking the onion should be thoroughly translucent and the carrots softened.

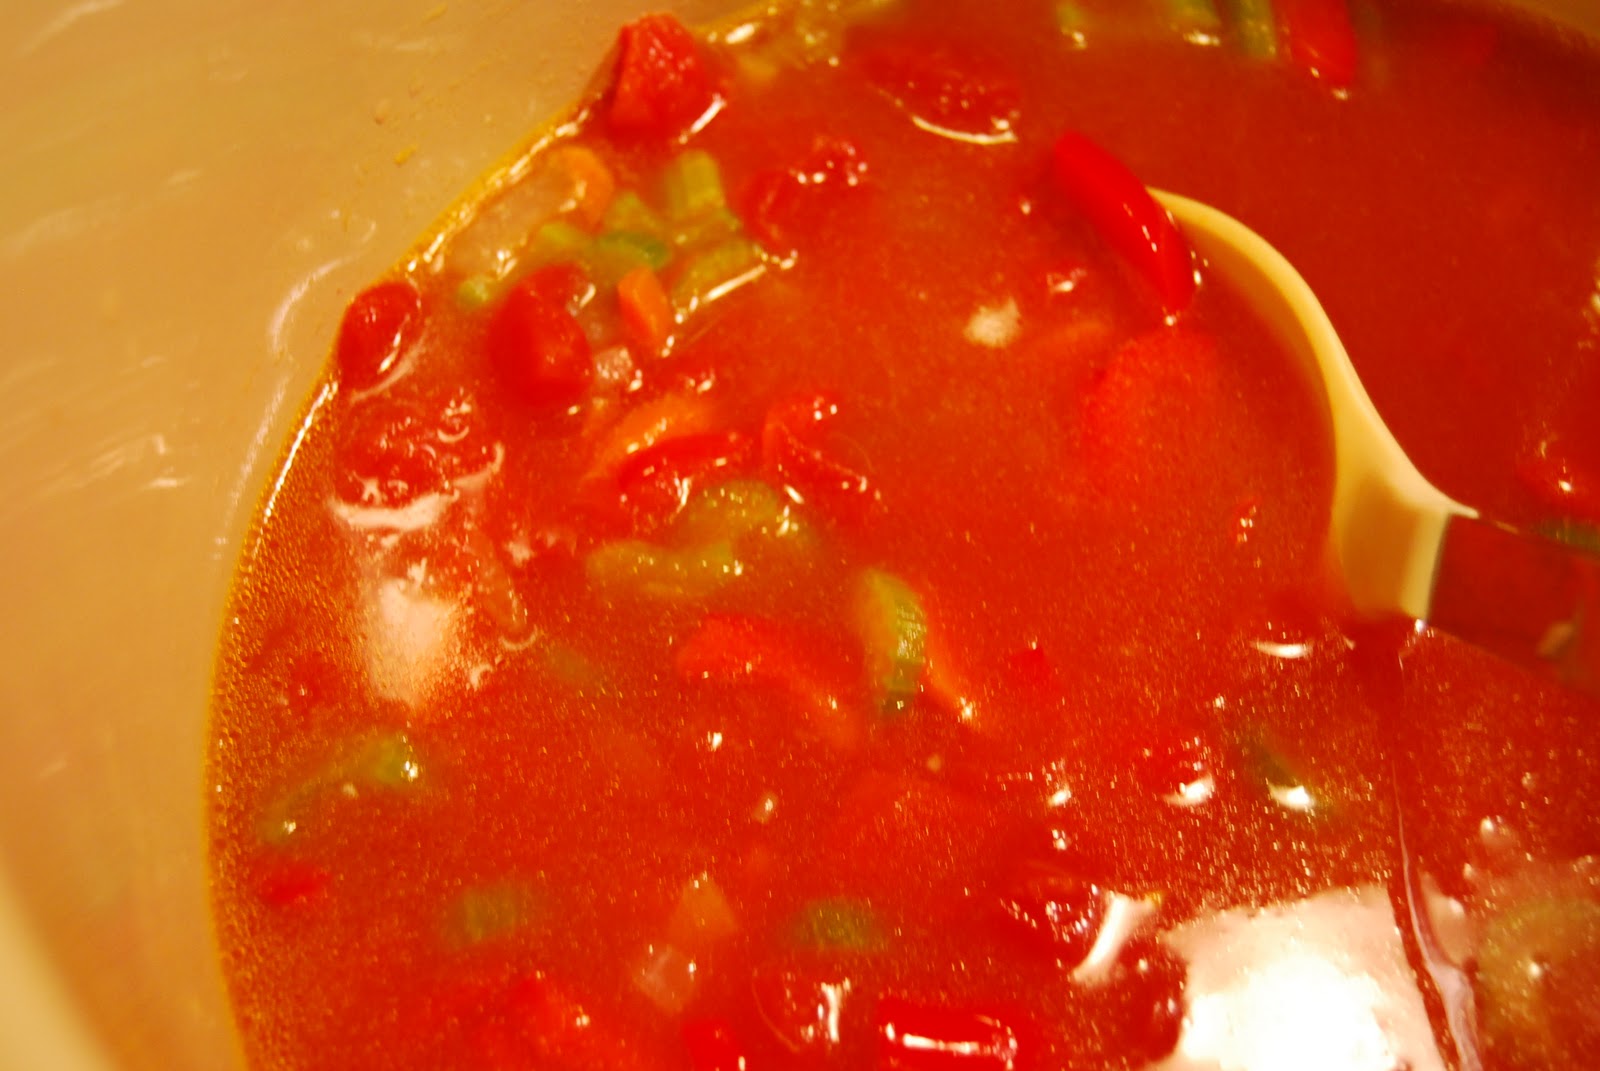
Add the three cups of chicken stock and the can of tomatoes and give it another stir with one final sprinkle of salt.  Turn the heat up to bring it to a boil.  Once the soon-to-be soup is boiling place the top on and reduce the heat to low for 15 minutes.


While the soup is getting soupy it is time to make a grilled cheese sandwich.  Here is the thing, I know that grilled cheese sandwiches can be make with tomatoes, bacon, fancy, cheeses, beautiful challah (my personal favorite), and sweet and savory jams, but, when I have a grilled cheese with soup I always go with an old faithful, American Cheese.  Yes, wrapped in plastic and not really cheese at all, it is the perfect melty goodness perfect for soup dipping.

Grilled Cheese Ingredients – silly, I know
2 slices of Multi-grain bread
Some butter, not a lot, really
1 1/2 slices of American Cheese per sandwich
Double as needed
Lightly butter both sides of the bread.  Very lightly.  Place cheese in between slices.  Put bread together and then put on a pan, or even better for a more authentic panini experience, grill it on a press or the George Foreman grill you still have from college.  Cook the sandwich on both sides (of a pan) until browned and the cheese is melted, or on the grill press for 3 – 4 minutes.
I like a smoother soup, and I like being able to use the random kitchen tools we have so out came the immersion blender.  You can also use a food processor.  The quick blend – 3 – 5 pulses takes the soup from a chunky minestrone style soup to the more classic tomato soup.

Be fancy, serve it cute.  This is a fairly healthy meal that will leave you feeling full, comforted from the cold and great to share.  Extra points to Mark for his great food styling and photography!

Baked Donuts, a Delight for the Holiday Season


There are two “traditional” Hanukkah foods: latkes (fried potato pancakes) and sufganyot, (donuts, fried dough balls).  This doesn’t really add up to the healthiest food choices.  For our Hanukkah party last weekend I knew I couldn’t skimp out on traditionally made latkes, but donuts…  that I could tweak.  

I scoured the Internet for baked donuts, with ingredients that I had on hand and I lucked out with a recipe from Piece of Cake.  This rules out any recipe that calls for buttermilk powder, shortening, etc.  Which means, you probably have these ingredients too, and because they are baked and not fried you might want to enjoy this less guilty treat after Hanukkah, or Christmas morning.
Baked Donuts Ingredients
For the dough:
1/2 cup + 3 tbsp warm milk, 95 to 105 degrees
1 1/8 teaspoons active dry yeast
1 tbsp melted unsalted butter
1/3 cup sugar
1 egg
2 1/2 cups all purpose flour
1/8 teaspoon nutmeg
1/2 teaspoon kosher salt
Topping:
3 tbsps of unsalted butter
1/3 white sugar
1 tbsp cinnamon

So here is the thing, this recipe can look pretty intimidating.  It has yeast, it has a specific measurement for milk, yikes.  But here is the truth.  I made this recipe without a rolling pin, while preparing and serving a Hanukkah meal for 8 and with three adorable kids running around, in other words – these pictures, not so hot – but the donuts, out of this world.

Pour the yeast in the base of your Kitchenaid Mixer, or a large bowl, and then add 3 tbsps of the warm milk.  I used a thermometer to get this just right, and its important – in this case baking is more like delicious chemistry, than playtime.

 
While the warm milk and the yeast are dancing and expanding and doing their magic, you are melting some butter and combining it with the rest of the milk and the sugar.  Allow the yeast and milk to get to know each other for about five minutes, no less but, more is okay.  Then add the butter/sugar/milk combination to the mixer.
Now, in a separate bowl, combine the flour, salt and nutmeg and slowly pour the dry ingredients into the mixer all while mixing with the paddle on a low speed (I used 2).  Add one egg and let that continue to incorporate.  When the flour is fully mixed in, should take 3 minutes or so, remove the paddle mixer and attach the dough hook.


Let that hook do its work for a few minutes and pull the dough from the bowl and put some of your own muscle into it.  Sprinkle some flour on your workspace and knead the dough into a soft, smooth ball.  Place the ball into an oiled bowl and wrap the bowl with plastic and tuck it away into a warm space for at least an hour.
I did this at 11am, when family arrived at noon.  After about an hour roll the dough out to about 1/2″ thick and cut your donuts.  You do NOT need fancy tools.  I used a juice glass for the big rounds and a shot glass for the holes.  Once the donuts are all cut, cover with a clean kitchen towel and tuck the pan away for another 45 minutes.

After 45 minutes your donuts are soft, puffy and are ready to bake place them in a 375 degree oven for 8 – 10 minutes.  They should have a very soft golden glow, mine were very soft gold, but that just added to their super soft chewiness.


While the donuts are baking, melt three tablespoons of butter.  When fully baked dip each donut (top and bottom) into the butter mixture and then into the sugar and cinnamon mixture.

Yes, your fingers will get messy, and yes you will have used a lot of utensils and bowls, but you know what will also happen?  The twelve awesome donuts that you made will disappear, and your niece will return again and again to the table seeking out one more bite.  I think they even beat Dunkin’.