Category Archives: entertaining

Candied Pecans and Bleu Cheese Bites


This originally was featured on the DC Ladies Blog but the recipe was too easy and too good to not share!
Earlier I posted savory bleu cheese and pecan cookies, which were awesome and easy and fun to eat for breakfast, if that’s your thing (which, evidently it is mine). Anyway, those cookies were the round 2 to this even easier, and also quite charming, appetizer.  Because the whole thing takes about 8 minutes to prepare and assemble this might be perfect for when you have surprise company or perhaps need reinforcements at a cocktail party.

Candied Pecans and Bleu Cheese Bites
Ingredients
French baguette
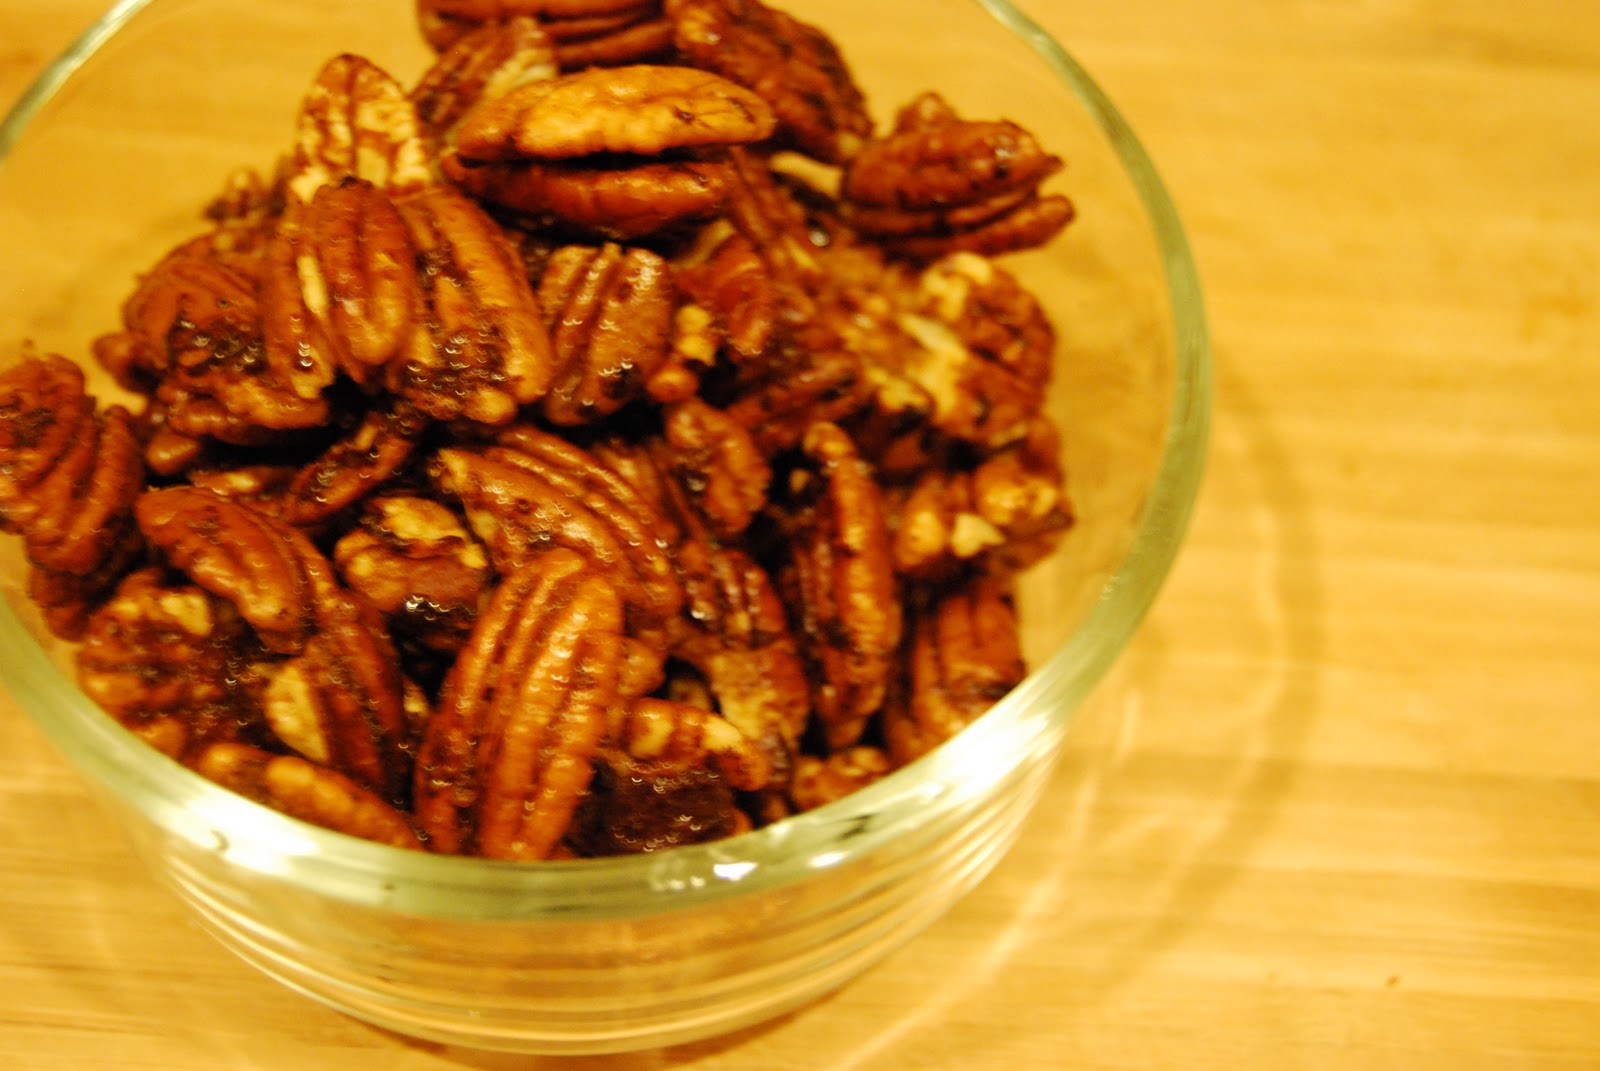
Candied Pecans, recipe here
Bleu Cheese crumbles
Honey
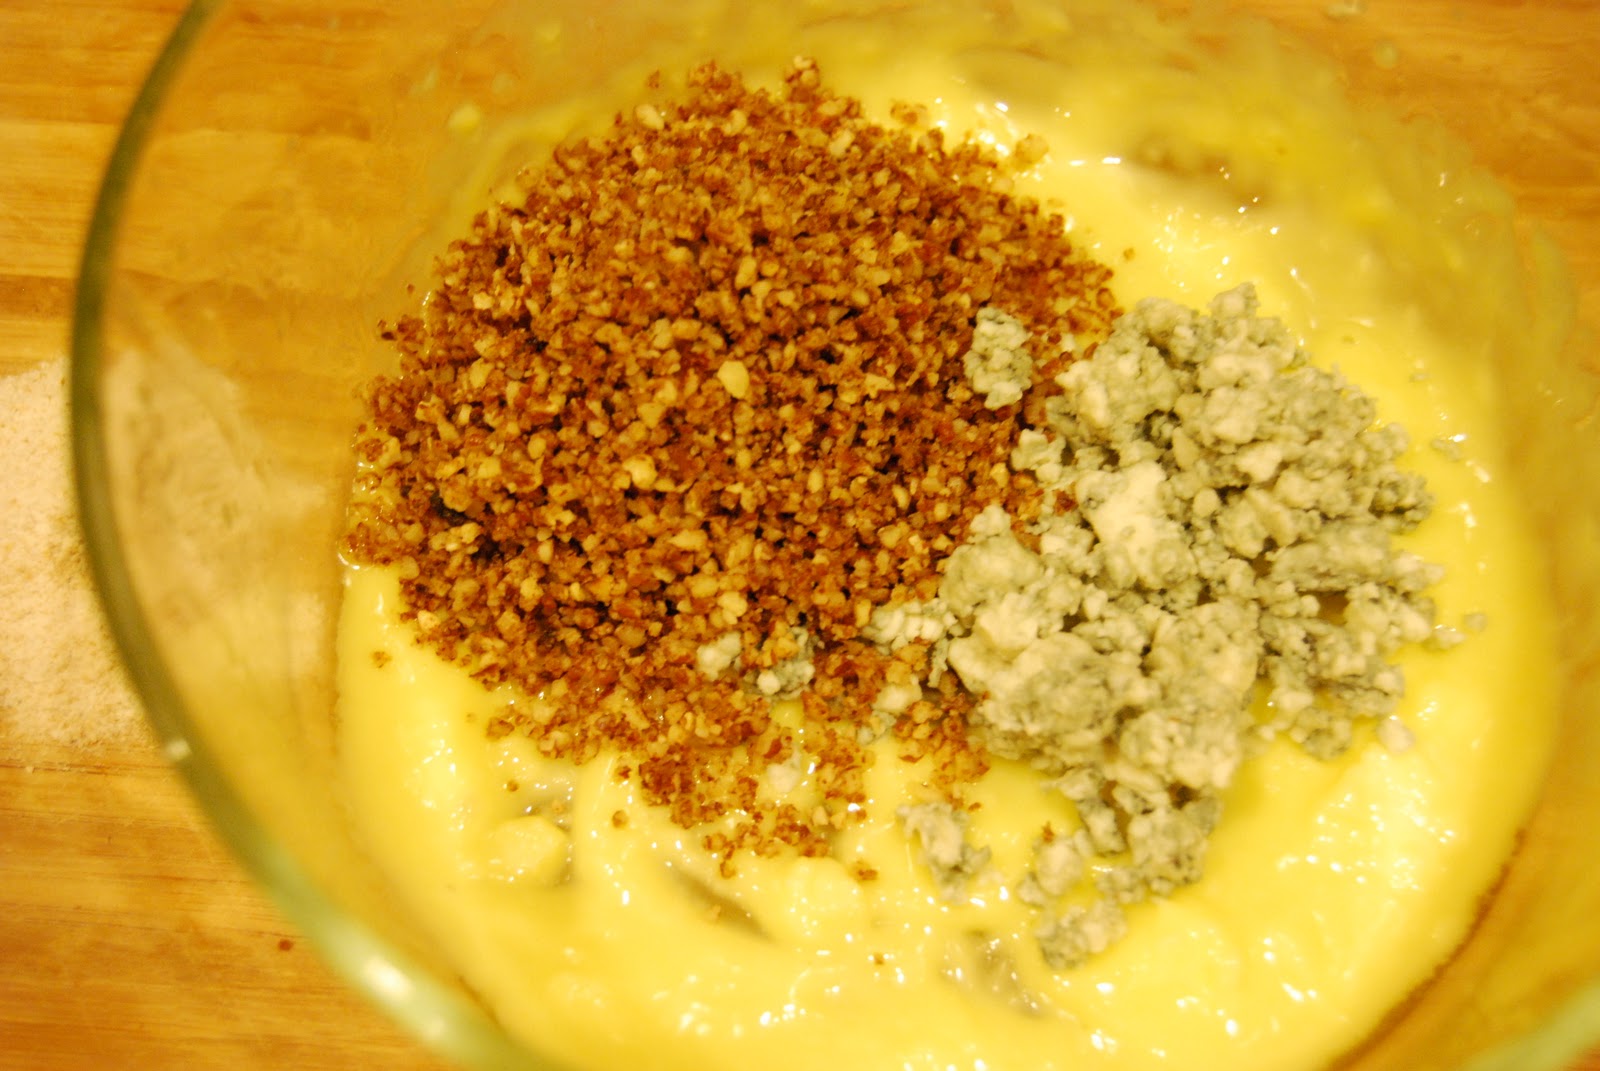
Your freshly made, or store bought pecans get a good chop and are set aside.
Cut a French baguette into thin slices and toast lightly.  (This isn’t really necessary, but generally speaking there are few things better than warm bread).  With the back of a spoon “spread” the crumbled bleu cheese on top of the baguette slices. 
Sprinkle on top of the bleu cheese and the chopped candied pecans and a light drizzle of honey.


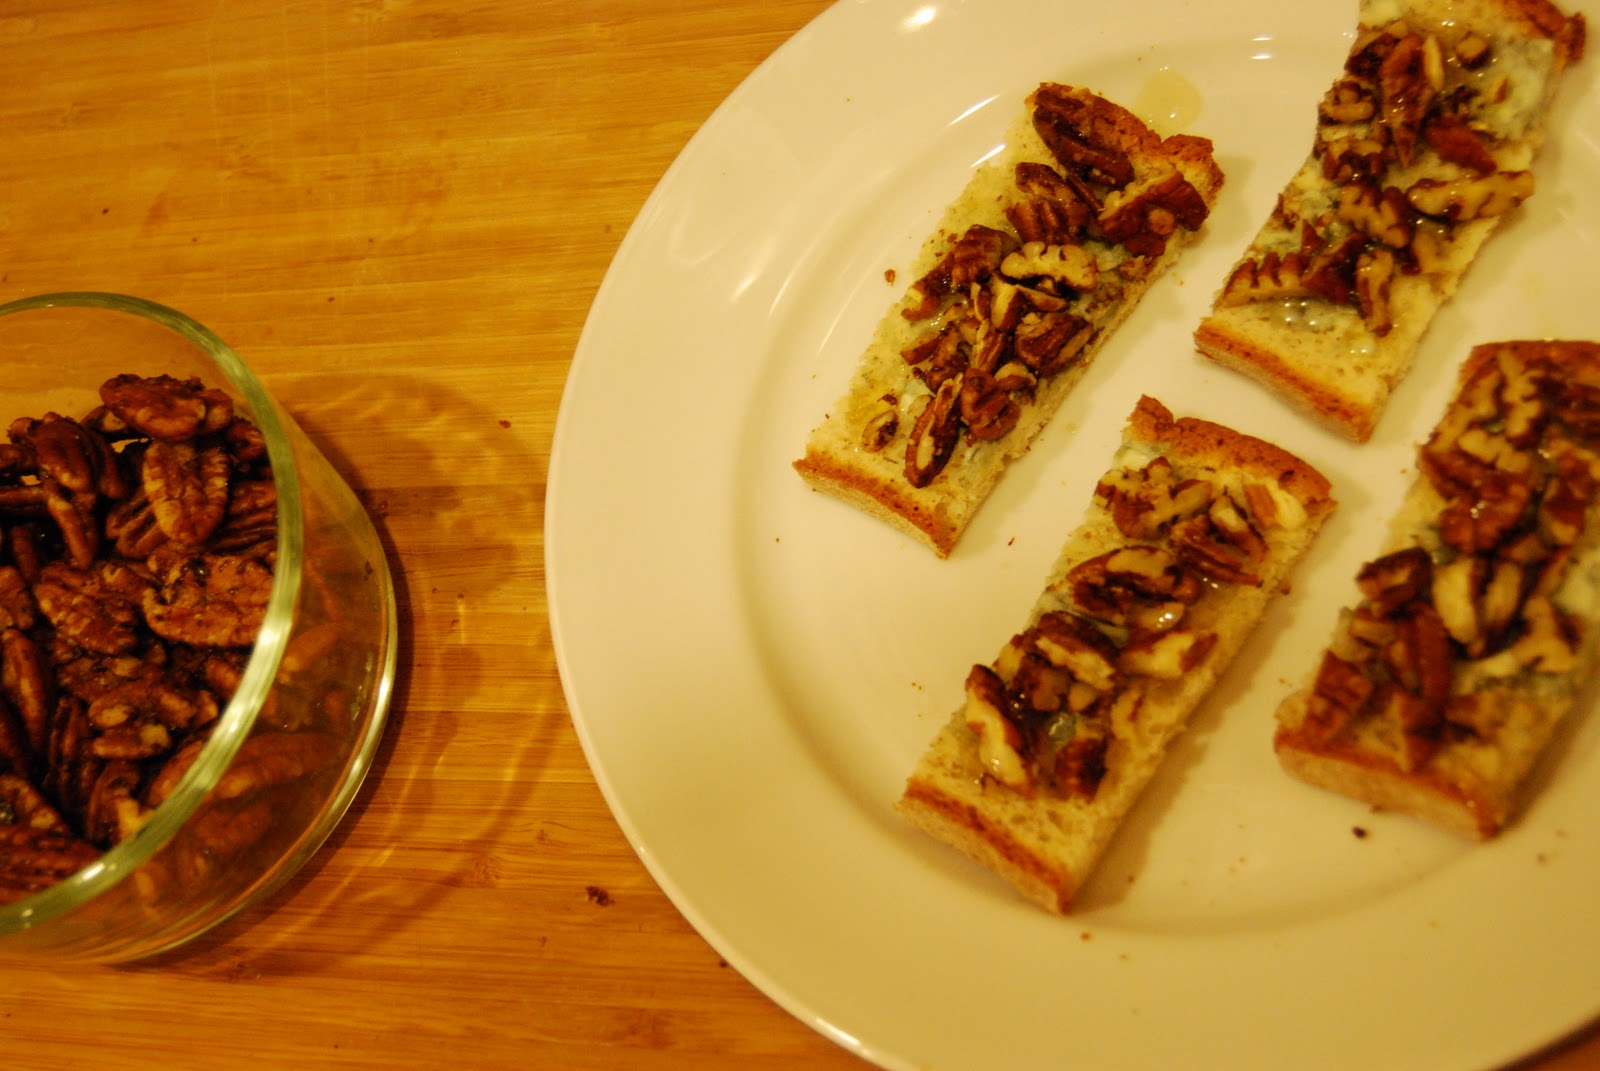
Each bite is like a divine sampling of a cheese platter at the most divine wine bar, and easy to do and made with ingredients that are probably in your pantry!

Happy Holidays – wishing you delicious entertaining!

Bleu Cheese and Candied Pecan Savory Cookies


I love cheese, like looooove it.  I love going to a restaurant and getting to order a cheese plate: with beautiful wedges of fragrant cheese, breads, honeys and perhaps some nuts.  The idea of this arrangement of flavors always seems so sophisticated but perhaps a little intimidating to try at home.

I tested this out last night (in two different way), and success!  These Savory Cookies are perfect for when you entertain, as an a pre-meal snack, or as a gift to a hostess packaged in a cute bag.

Ingredients:
1/2 Cup of Whole Wheat Flour
1/2 Stick of Butter (4 Tbsp), softened
1/3 Cup of Candied Pecans, grounded
1/4 Cup of Crumbled Bleu Cheese

Candied Pecans
1 1/4 cup of Pecans
1/2 tbsp of butter, unsalted
1 tbsp of brown sugar
1/2 tsp of cinnamon

In a non stick pan melt butter, add the pecans and sugar and cinnamon and stir with a silicon spatula over low-medium for 5-7 minutes until the pecans are covered with small flecks of caramel goodness.  Set aside to cool

In a food processor grind up the pecans to a small grind, but now a fine powder.  Set aside.
In a medium size bowl blend the softened butter and then add the bleu cheese, ground pecans and flour.  Side note, you could definitely use regular all-purpose flour, but I opted for whole wheat for its nuttier flavor and texture, and the potential for it to be a little more nutritious.
The dough will be crumbly, and look like a bunch of little tan colored peas.  Sprinkle a little extra flour on your work surface and begin to form the dough into a log.  This is completely visually unappealing.  I’m sorry – please, don’t let it dissuade you from making this recipe…
Cut the dough into 1/3″ slices and lay out on a non-stick cookie sheet or silpat and bake for 15 minutes at 350 degrees. (See those flecks of cheese?  They are going to bubble and melt into amazing deliciousness!)
Let these cool for about 10  minutes after baking and serve with your favorite wine and either a drizzle of honey on top or a small dollop of your favorite pear or apricot preserves (that helps add back the sweetness found on your favorite cheese plates).

 These are great, and they keep nicely, and well, if we’re being honest I ate two for breakfast so they’re all around perfect snack to bake and share.

Don’t Forget the Centerpiece


When entertaining for the holidays, or really any time of the year, your table is never fully dressed without a centerpiece.  The Fall and Winter seasons provide plenty of inspiration for table decor that is special but also simple. 

I first turn to the master of all “good things”, Ms. Martha Stewart, for inspiration:

For a simple everyday table setting how sweet is table with a collection of small sized baskets with seasonal fruits?  Let the fruit double as part of your dessert and you have a two for one special.
via Martha Stewart
 In a continuation of the fruit theme, I love the stately nature of the pillar candles and baskets filled with plump berries and grapes.  The colors sing fall while not being generic or too obviously themed.
via Martha Stewart
 For a crafty decor idea there is nothing easier than this for the mantle: take candle holders/vases that you already own and wrap with pretty paper and secure with a double stick tape.  An illuminated candle inside gives this idea an ever brighter glow.
via Martha Stewart
 I love, love, love this centerpiece.  It is a true centerpiece and worthy of a special dinner or even a fall wedding.  A bundle of wheat twisted and tied with a beautiful silk ribbon compliments the warmth and heart of the season.
via Martha Stewart
Here are some more great centerpiece ideas that I could not resist:
From pottery barn, this is a simple hurricane candle holder wrapped with dried maze and tied with twine.  It probably take no more than minutes to assemble but makes a very pretty visual impact.
Via Pottery Barn

Or you can always order a vibrant, beautiful bouquet of flowers for your table and for around your home:
via FTD
via 1800Flowers
Whatever you do keep it easy, make it reflect you and your home, and make it special with a little extra sparkle.

Happy Friday and have a beautiful weekend!

Setting the Table for Family and Friends


In my immediate family there are four of us.  Pretty average, nothing anyone would consider “large”.  However, my family doesn’t do holidays with just the four of us.  Holidays with my family include everyone: all the grandparents (I am blessed to have four healthy, amazing grandparents), all of the cousins, aunts and uncles, cousins and siblings and children of all of the cousins and aunts and uncles and of course friends that feel like family.  It is not unusual to gather around the table for Passover or Rosh Hoshanah or be spread throughout the house on Thanksgiving with 40 – 50 people.


Not quite this long, but you get the idea
Let me ask you, how do you set a table for 40 – 50 people?  Most people do not own a set of China for 40-50 people, and rarely does the heaviest stock of paper plates hold up to a good Jewish brisket…  
Necessity being the mother of all invention the table would be set  communally; beautiful China would come from an Aunt here, a cousin there, a sister from nearby.  At the end of the day a beautiful table would be set in creams and gold that was worthy of the best crowd and food.
When we got married I registered for plain, everyday white China from Pottery Barn, but now that we have moved and I have more storage in my kitchen and a proper dining room for entertaining the idea of expanding my collection is not lost on me.  Here are some entertaining must haves, for now:

Dazzle Dinnerware by Crate and Barrel

Wood-Slices Dinnerware by West Elm

Vera Wang for Wedgwood “Gilded Weave”

Growing up I would volunteer for table setting duty at my cousin Deborah’s house, and the look and feel of an extra long table, with shining glassware and matching mismatched plates has always stuck with me. The Holidays are special and are meant to be treated with extra care, a little extra sparkle and spent with the most important people.

It doesn’t even matter if you eat take out Chinese on your China, just make it special!

Stuffed Mushrooms for Last Minute Appetizer


Stuffed Mushrooms are the kind of appetizer that takes no time to make, you’re likely to have all of the ingredients in your refrigerator and pantry, and they are delightful bite full of flavor.

Stuffed Mushrooms Ingredients:
15 medium Baby Bella Mushrooms (a whole container)
2 tbsps of Olive Oil
1/3 cup of Italian Bread Crumbs
1 tbsp of Skim Ricotta Cheese
2 tbsps grated parmesean
2 tsps of italian seasoning
Dash of Red Pepper Flakes
Salt and Pepper to taste
Add chopped basil, or parsley, chopped garlic
First rinse and rub all of the mushrooms and let them dry.  Remove all of the stems and reserve.  Take the stems and chop them to a small chop.  

In a small bowl add all of the seasonings, cheese, bread crumbs and olive oil.  Add to that the chopped mushrooms.

With a fork mix all of the ingredients.  This recipe is sort of the exact opposite of baking; you can swap out other ingredients, you can change the seasoning, want more spice, less spice, no cheese, more veggies, this is a great clean out the pantry in a flash recipe.


Prepare the oven to 400 degrees and put parchment paper on a cookie sheet.  Turn the mushrooms cavity down and lightly oil the outside of the mushrooms, and sprinkle to taste with salt and pepper.  With a small spoon, or of course your fingers, stuff the mushrooms to the top.


Bake for twenty minutes.  Allow to cool, just long enough so that when you pop an entire mushroom in your mouth and it’s not so hot that you have to do that “it’s too hot” dance.  Enjoy!

Going Bananas for Plantains


I love bananas for breakfast, it’s what I ate for breakfast this morning.  Plantains on the other hand are not for breakfast, but equally (if not more delicious).  I am not a food scientist a la Alton Brown but I did a little research so I’ll pass it on so we’ll all know how bananas and plantains are different fruits.  

Plantains are in a green, thick skin, they can’t be eaten raw and are starchy and used as a vegetable, whereas bananas, well you know, yellow, think skin, sweet, good in cereal!

When we had our Latin fiesta night in addition to the watermelon, salsa and Mexican inspired s’mores we also served tostones, or plantain fritters.

Tostones Ingredients:
3 Large Plantains (party of 8)
Vegetable Oil of some variety, we used Canola
Kosher Salt

Open the tostones, you’ll probably need a knife as they don’t break open as easily as a banana.  Cut slices that are about 1 inch long. 


Put oil in a large pan (about an 1/3 inch high) over heat over a medium/high flame.  When the oil is hot enough, not burning or bubbling, but hot enough to react if you flicked some water from your finger tips into the oil, place plantains in slice side down.

Cook plantains for about 2  minutes on each side. 


This is a sensitive time, you’ll want to keep an eye out so you can get a nice rich caramel color on the fried side.  Too light and thetostones will be too starchy, too dark, they might taste like burned sugar.


Set up all of the fried tostones on layers of paper towel to absorb any of the oil that is being released, just like latkes, onion rings, or anything fried you’ll want to mop up the extra oil so you can get right to the flavors of the food.  Stop!  Do not discard the extra oil!


Time to smash!  I suppose if you had kids, which I don’t, this could be a fun thing for them to do with supervision. (This was also a great thing for Mark to do, that’s him!)  Set up a cutting board and grab a can from the cupboard.  Smash!  Smashing the plantains to about a 1/2 inch will be perfect.


The smashed plantains go back in the oil for about 20-30 seconds on each side just to crisp up the sides, and then back on new paper towels.

This is delicious now, and ready to eat.  But to maximize that salty-sweet combination that is so hard to beat grab that Kosher salt and lightly sprinkle over the tostones, then just try not to eat all of them!

Classic, with a Kick


Earlier in the week I mentioned our Latin inspired fiesta, and our large menu.  I knew when planning the menu that as always we would have a lot of food, and I wanted to keep everything light, easy to prepare and fun.  So, while I love tres leches and flans, I knew they would work with the rest of our hand held menu, and goal for being outside.

And that was when Mexican S’mores were born.    
 
Of course I originally intended to make my own graham crackers, I even thought about making my own marshmallows, but as you might imagine those plans don’t jive with “easy to prepare”.  So what is more easy to prepare than a box of graham crackers, a bag of marshmallows and 2 packets of Lindt Dark Chocolate with a hint of chili?  I’ll tell you what’s easier, just about nothing!  
What I had envisioned was using our grill to gently toast the marshmallows to a lovely golden brown.  Instead it rained all day and the cooking and s’mores making moved inside.  

No fear, these are just as good when they are made in the oven.  

Steps to S’more Success:
1. Preheat oven to 500 degrees
2. Put foil on top of a baking sheet
3. Put marshmallow on top of chocolate square on top of half of a graham cracker
4. Place in oven, with the light on and pace/dance/chat for about 90 seconds because then the marshmallows will be soft and browning.
5. Stack graham cracker half on top.
6. EAT!, and eat again and again.

I think other delicious flavors would include those Ghirardelli squares with a little mint, caramel or peanut butter filling – the options are endless and the results are deliciously fun!

Fresh Salsa, almost like Vacation


This past weekend we had friends over for linner, late lunch/early dinner.  Since we were prepping the food, and they were supplying the drinks, I got started on planning out a themed menu.  The weekend before I  reminisced about the amazing food we ate on our honeymoon to Mexico, and so the theme developed on it’s own, we’d be doing a Latin inspired meal.

We served up salsa fresca, chunky guacamole, mango coconut fish and pulled pork tacos, roasted tomatillos, out of this world tostones, cilantro rice and garlicky black beans, watermelon and lemon, and Mexican s’mores.

The Salsa was a huge hit, and it turns out it is actually America’s most popular condiment – who knew?!  
 
Ingredients:
3 cups of Cherry Tomatoes
1/2 cup of Red Onion
1/2 cup of White Onion
1/4 cup of Cilantro
1 Jalapeno, with seeds removed and sliced
The Juice of 1 Lime
A sprinkle of salt to taste

I think salsa is a dish where you sort of know what you like.  Want more onions? Throw in more onions.  Hate cilantro?  Skip it.  

One tip I practiced was something I learned from Chef Rick Bayless, which was to wash the onion in a bit of cold water to reduce their bite.  I guess if you wanted that onion-y bite you could skip that too.

Here is a trick that we created out of necessity, and it worked like a charm: we didn’t want soupy salsa.  So as the tomatoes were being chopped they were dropped into a colander so that the extra tomato juice could drain out.  

Then all the ingredients go into one big bowl, and they get to know each other, they mingle, they dance and then they meet a chip and fall in love. No chips?  Yikes!  Also amazing with rice and beans, over grilled chicken or eggs.

If you have a bounty of summer tomatoes, this is a simple, low calorie way to use them up, and transport yourself to a beach vacation getaway. 

Pizza Party


The weekend is usually a great time for a pizza party, this week in our house a Tuesday was also a great time for such an event.  Our friends were coming over and we wanted to have a dinner that was fun to put together, easy to prepare in advance and a favorite for everyone.  Pizza was the winner.

I have made pizza with my mother-in-law, but mainly the sauce and into the oven stage, never the dough stage.  She is currently in Italy, had she been in town I would have used her recipe, but I made to with what was called the “Best Pizza Dough Ever” Recipe by Peter Reinhardt.

Ingredients:
4 1/2 cups all-purpose flour, chilled
1 3/4 teaspoons salt
1 teaspoon instant yeast
1/4 cup olive oil
1 3/4 cups water, ice cold
Semolina flour OR cornmeal for dusting 
The ingredients are simple, and what is easy more simple is how to do it.

Mix all the dry ingredients (flour, salt, yeast) in one bowl and then add the olive oil and water, and get to mixing with a large chilled metal spoon.

I could have used my stand mixer for this recipe, and so can you, but I figured for the first time I wanted to know what it felt like.  After about 5-7 minutes of turning the bowl and working the dough it should be “tacky” not “sticky” and able to peeled from the sides of the bowl, but not so much the bottom.  If it’s too dry, add a teaspoon of water, if it’s too sticky add a little more flour – but this is something you can just judge by your eye.

Pour some flour out onto the counter top and just gently work the dough is a soft, smooth ball, and then divide into six just about even chunks.

Mist the dough balls with olive oil, or like me put oil on your hands and then drizzle onto the dough.  The original recipe calls for putting the dough on parchment paper, which I don’t have, misting the parchment paper, and then wrapping it with a food safe bag. I put some semolina flour on the pan and covered it with a tea towel – I think our results were the same.

Two days later…

Time to get cooking on a Tuesday night!  The dough has grown and now the question is how to top it.
I have a pizza stone in the oven preheating to 450 degrees for 45 minutes.

Our toppings included:
Grilled peppers
Grilled chicken sausage
Sauteed mushrooms
Oven dried tomatoes
Homemade Tomato Sauce
Truffle Salt
Fresh Basil
Parmigiano Reggiano
Mozzarella


I rolled out the dough to about 1/4 of an inch in an uneven pattern – no need to strive for perfection here.
And then I kept the toppings simple, the thin dough doesn’t really want to be weighted down with a lot of heavy toppings.  And then, we ate – and it was delicious!

Enjoying the Bounty


For the past few days my home Internet has been down – which means I haven’t been able to share pictures I have taken, or any new recipes.  I’m overflowing with sweets and savories!

As an appe-teaser, enjoy some of the bounty from our trip to the Bloomingdale Farmer’s Market.

Parsley, Sage and Basil from our Friend’s Backyard Garden
25 Pounds of Sauce Tomatoes – lots of chopping for lots of delicious homemade sauces.
Beets and Radishes that were used for Sunday’s Lunch
Shots of Espresso to end the day

The table is set for a Sunday feast – recipes to follow!